Monday, November 30, 2009

...and this makes 30!


What a month this has been. This post is the conclusion to the challenge from NaBloWriMo, of posting everyday for an entire month, what an accomplishment. As you can tell by my previous posting archive, my average has been about one post per week. Posting every day is a raise of the bar to say the least. My intent at the beginning of the month was to step up to the plate and try to improve my writing, content and photography. I’m not sure if I accomplished that, I have a very long way to go. But it has helped me organize my time better, but sadly not my desk. It is still piled high with files, magazines, cookbooks, etc.

I thought it also might be apropos to take this opportunity to say good-bye to a treasured presence in the food world, Gourmet magazine. After nearly 70 years of fine eating and literary prose, Gourmet magazine is ceasing publication. Conde Nast, the parent company, blamed the tough economic climate as the reason for closing the publication.

For those of us in the food world, the closure is a bit like waking up to find the end of an era. This magazine was unique in its rich content; not only was Gourmet a cooking magazine, it also explored the culture and increasingly the politics of food. The editor-in-chief of Gourmet Ruth Reichl is starting another chapter in her life and I wish her well.

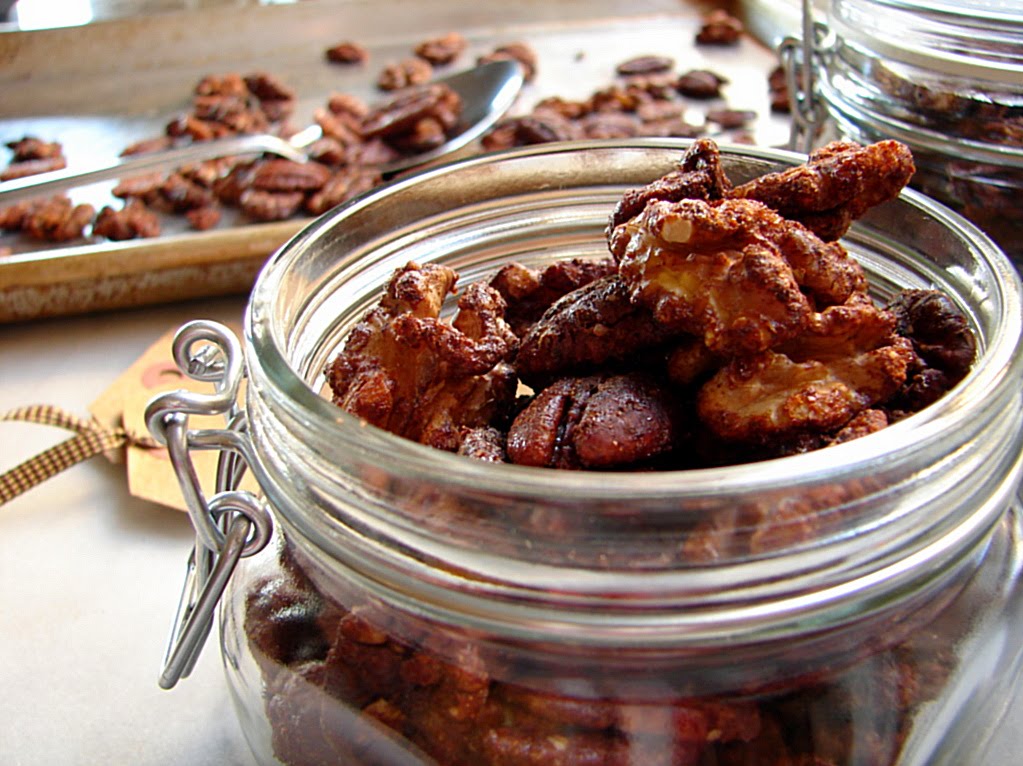
So in tribute to Gourmet, I decided to make a little something from the last issue, spiced nuts.  A handful of these sweet-savory golden pecans and walnuts is just the nibble you need while you prepare for all of those holiday activities…or perhaps as you pull out and thumb through your past issues of Gourmet and get inspired once more.

Enjoy!
Shannon

Sweet and Savory Spiced Nuts
From Gourmet magazine November 2009

3 Tbsp. sugar
1 tsp. paprika
1 tsp. ground cinnamon
½ tsp. ground cumin
Pinch of ground cloves
1 large egg white
2 cups walnut halves (8oz.)
2 cups pecan halves (8oz.)

Preheat oven to 350°F with rack in middle. Lightly oil a 4-sided sheet pan.
Whisk together sugar, spices, and ¾ tsp. salt in a small bowl.
Whisk egg white in medium bowl until frothy, and then stir in nuts. Add spice mixture and toss to coat.

Spread nut mixture in 1 layer in sheet pan. Bake, stirring once or twice, until dry and well toasted, about 20 minutes. Loosen nuts from pan, and then cool completely.

Nuts keep in an airtight container at room temperature 1 week.

Makes 4 cups

Sunday, November 29, 2009

kicked-up gingerbread


When I was going through Jamie Oliver’s cookbook Cook with Jamie, I came across a recipe for what he calls the “Ultimate Gingerbread”. He said that the when he was visiting Grasmere, in England’s Lake District he stopped into a shop that had the best gingerbread he’d ever eaten. He says that they use a secret recipe which is about 150 years old and, of course, they wouldn’t give the recipe to him. So he decided to have a go at it on his own. The result…it is probably some of the best gingerbread you’ll ever eat! The recipe calls for not only ground ginger but also crystallized ginger as well as some candied citrus peel. These additions give this unusual gingerbread a spicy-citrus kick that is tasty as a cookie, but also works pretty fine sprinkled over ice cream or even used as a cheesecake base.

His recipe also calls for golden syrup (an English export called Lyles), which amazingly I did find at a little gourmet shop in town. But if you cannot find golden syrup a mixture of 2 parts light corn syrup to 1 part molasses will do the trick.

So if you want to add a little something different into your baking plans this holiday, give this one a try.

Enjoy!
Shannon

Ultimate gingerbread
Adapted from Jamie Oliver’s cookbook Cook with Jamie

14 oz. store bought shortbread or homemade
6 oz. raw sugar
2 tsp. ground ginger
1/3 cup mixed candied citrus peel, chopped
1/3 cup crystallized ginger, chopped
7 Tbsp. all-purpose flour
A pinch of baking powder
2 Tbsp. golden syrup
2 Tbsp. molasses
5 Tbsp. unsalted butter

Preheat the oven to 325°F and find a baking pan about 8x14 inches. Put the shortbread, sugar, and 2 teaspoons of the ground ginger in a food processor and whiz until you have crumbs. Remove 3 ½ oz. of the mix and keep this to one side. Add the remaining teaspoon of ginger to the processor, along with the mixed peel, crystallized ginger, flour and baking powder, and pulse until well mixed.

Melt the syrup, molasses and butter together in a saucepan big enough to hold all the ingredients. When melted, add the mixture from the food processor and stir with a wooden spoon until everything is thoroughly mixed together. Tip into the baking pan and spread out evenly. Press the mixture down into the tray, using your fingers or something flat and clean like a potato masher or spatula. When the mix is a flat, dense even layer, pop the tray into the preheated oven for 10 minutes.

Take the tray out of the oven and sprinkle the hot gingerbread with the reserved crumbs, pressing them down really well with the potato masher or spatula. Carefully cut into good-sized pieces with a sharp knife, and leave to cool in the pan before eating.

Saturday, November 28, 2009

the dare


The November 2009 Daring Bakers Challenge was chosen and hosted by Lisa Michele of Parsley,Sage,Desserts, and Line Drives. She chose the Italian Pastry, Cannolo (Cannoli is plural), using the cookbooks Lidia’s Italian-American Kitchen by Lidia Matticchio Bastianich and The Sopranos Family Cookbook by Allen Rucker; recipes by Michelle Scicolone, as ingredient/direction guides. She added her own modifications/changes, so the recipe is not 100% verbatim from either book.

This was the first time that I have ever attempted making Cannoli and I must say they were well received by my clan of recipe tasters. I have to admit I completely strayed off the traditional recipe (no surprise there). When I heard about the challenge for this month I was going through a "passion fruit" stage, experimenting with them in different ways. This all to say I decided to go a more "tropical" route instead of the more traditional "Italian" style. So, if you would like to try the traditional cannoli recipe just click the link for theDaring Kitchen  and you will also be able to see some of the wonderful pictures that have been submitted as well. If you would like to try your hand at the "tropical" type try this one...it turned out great!

Enjoy!
Shannon

Coconut & Key Lime Mascarpone “Cannoli” with Passion Fruit Coulis
Loosely adapted from Gourmet May 1995

For “Cannoli” shells:
About twenty 6-inch square parchment paper
¾ cup flaked unsweetened coconut, toasted and cooled
2 Tbsp. all-purpose flour
5 Tbsp. unsalted butter, cut into pieces and softened
½ cup granulated sugar
2 Tbsp. firmly packed light brown sugar
1 Tbsp. milk
1 Tbsp. coconut rum (optional)
Four 3 1/3 to 4 inch long cannoli forms (about 5/8 inch in diameter)

For filling:
4 ounces cream cheese, softened
1/3 cup granulated sugar
2 tsp. freshly grated lime zest
4 Tbsp. freshly squeezed Key Lime juice
1 cup mascarpone cheese

Passion Fruit Coulis:
8-10 passion fruit (an option if you can't find passion fruit would be mangos)

Accompaniments: fresh raspberries

To Make “Cannoli” shells:
Preheat oven to 350°F and lightly grease a heavy baking sheet.

Arrange 4 parchment squares on the greased baking sheet.

In a food processor blend together coconut and flour until coconut is ground fine. Add butter, sugars, rum and milk and blend until dough forms a ball, about 10 seconds. Spoon a well-rounded teaspoon of dough onto each of the 4 parchment squares and with slightly wet fingertips evenly pat into 2-inch rounds.

Bake cookies in middle of oven until very thin and golden brown, about 10 minutes. Immediately transfer cookies (still on parchment) to rack and let stand until just firm enough to hold their shape, 30-45 seconds. Working with 1 cookie at a time and using parchment as an aid, quickly roll cookie around a cannoli form to make a cylinder. (If cookies become too firm to roll, return them to parchment on baking sheet to oven 1 minute to soften.) Cool formed cookies on a rack before removing cannoli form. Make more cookies in same manner with remaining dough, baking and forming cookies in batches of 4 and allowing baking sheet to cool completely between each batch. Cookies are fragile. Cookies keep in one layer in an airtight container at room temperature 4 days.

Make filling:

In a bowl with an electric mixer beat cream cheese with sugar, zest and lime juice until smooth and beat in mascarpone. Chill filling, covered, until firm, at least 4 hours and up to 1 day.

Make Passion Fruit Coulis:

Cut Passion Fruit in half and scoop out seeds and pulp. Put into a food processor and pulse just until seeds begin to crack. Strain mixture through a fine sieve and refrigerate until ready to serve with “cannoli”.

Assemble dessert:

Whisk filling and transfer it to a pastry bag fitted with a ¼-inch plain or decorative tip. Carefully pipe filling into both ends of 12 cookies. Pour about ¼ cup Passion Fruit Coulis onto each of 6 dessert plates to distribute evenly, and top with 2 “cannoli” and raspberries.

Friday, November 27, 2009

soups on

Here is a tasty option for some of those Thanksgiving leftovers once the stuffing and gravy have been finished off. By adding some stock, and diced turkey, along with a little bacon (never a bad idea) and a few winter vegetables you can create another meal that will warm you up on a chilly evening.  And thankfully you don't have to even turn on the oven. 

Enjoy!
Shannon


Roast Turkey and Winter Vegetable “Chowder”
Adapted from The Thanksgiving Table by Diane Morgan

3 slices bacon
1 large yellow onion, cut into ½ inch dice
2 ribs celery, cut into ½ inch dice
2 large Yukon potatoes cut into ½ inch dice
1 butternut squash, peeled, halved lengthwise, seeded and cut into ½ dice
7 cups turkey stock or canned low-sodium chicken stock
1 medium zucchini, cut into ½ inch dice
2 cups chopped, de-ribbed swiss chard leaves
2 cups ½ inch dice of roast turkey or one Rotisserie Chicken
1 Tbsp. fresh sage, torn
1 Tbsp. fresh thyme leaves
Salt & freshly ground pepper
In a heavy 6-quart stock pot, cook the bacon over medium heat, stirring frequently, until browned. Remove with a slotted spoon to plate. Set aside.

Pour off all but 2 Tbsp. of the bacon fat, and return the pot to medium heat. Add the onion and celery. Sauté until the vegetables are soft, but not browned, about 3 to 5 minutes.

Add the potatoes, squash and turkey stock. Bring to a boil, and reduce the heat to a simmer. Partially cover the pot, and cook until the potatoes are tender, about 15 minutes.

Add zucchini, swiss chard, turkey, sage, thyme and the reserved bacon. Cook 5 minutes longer.

Add salt and pepper to taste. Ladle the soup into warmed bowls and serve.

Thursday, November 26, 2009

so thankful


Things I'm thankful for...
sunrise
a brand new day
family
friends
quiet mornings
holding hands
laughter
meals together
taste
rest
joy
music
comfort
slippers
coffee
flowers
the smell after a rain
rainbows
mountains
waves crashing
encouragement
beauty
creativity
toasty log fire
chocolate
scarves and mittens
snuggling
puppies
hope
sunsets

Psalm 95:2 “Let us come before Him with thanksgiving and extol Him with music and song.


Happy Thanksgiving!
Shannon

Wednesday, November 25, 2009

day trip

There is something to be said for just spending a day with no set schedule, and exploring new places. We decided to take a day and point the car north up the coast and meandered our way through the wine country of Santa Barbara.
It was a beautiful drive, especially right now as the trees are turning golden yellow.

This area for years was sleepy, and sparsely populated, until in 2004 the film Sideways made it a destination. Sideways follows two forty-something men with not much to show in their lives but disappointment.  They embark on a week long road trip through California’s wine country. It is said that “never before has a movie caused mainstream audiences to talk so much about wine.” This movie was set in the Santa Ynez Valley just inland from Santa Barbara. Credit is also given to the movie for improving Pinot Noir sales across the country, enhancing Santa Barbara winery tourism and piquing the interest of casual wine drinkers everywhere.

We ended up in Solvang, a quaint city that is home to some bakeries, restaurants, and merchants offering a taste of Denmark in California. The architecture of many of the buildings follows traditional Danish style. Windmills are scattered throughout the town and many of the sidewalks are cobblestone, which adds to the old world charm
There is a copy of the famous Little Mermaid statue from Copenhagen as well as one featuring the bust of famed Danish fable writer Hans Christian Anderson. But the highlight for me was the Aebleskivers that you can buy hot and fresh right on the sidewalk at the open bakery storefront windows. Aebleskivers are a delicacy, supposedly invented by some Dane way back in history. They are a waffle or a pancake formed like a tennis ball. The name makes people think that there are apples inside which is correct- if you put apples inside. Everybody has their own favorite recipe and way of serving them, depending from where in Denmark the recipe came. You can find them served several different ways in Solvang, most often with powdered sugar and raspberry jam on top. Take my word for it…they were awesome!

Enjoy!
Shannon

Tuesday, November 24, 2009

a good excuse


I don’t know If I ever mentioned it, but my husband and I are empty-nesters (except for the dog, but I’m not sure that counts). Both kids are away at college, one is in Chicago the other up the coast a few hours in Santa Barbara. So when the holiday’s come around I stock up on more food than usual and get in the mood to make things I wouldn’t normally make for just myself and the hubby.

Usually breakfast for me is a latte with an extra shot to get me going…sometimes I might grab a banana before I head out the door, but it always seems like they have just gone past their peel and eat stage to the “oh dear, I guess I better make banana bread stage”.

So with the Thanksgiving break in full swing, what better way to treat these worn out college kids than to make homemade doughnuts for breakfast…sinful I know, but so delicious!

These doughnuts are a fantastic breakfast, naughty snack or tasty dessert. The important thing is that they must be served warm and tossed in the spicy-citrus sugar. These little babies are great to dip into a fruit compote or even a chocolate sauce .

Enjoy!
Shannon


Doughnuts with Spicy-Citrus Sugar
A slightly adapted Jamie Oliver recipe

This recipe is from Jamie Oliver, I’ve modified the process in that I use my stand mixer…it was so much easier than the whole kneading thing.

1 ¼ ounce package active dried yeast
1/3 cup superfine sugar
3 ½ cups all-purpose flour
1 ½ cups plus 2 Tbsp. whole milk, warmed until tepid
Zest of 2 lemons
Zest of 1 orange
5 ½ Tbsp. unsalted butter, softened and cubed
1 ¾ pints vegetable oil

For the spicy-citrus sugar
½ cup superfine sugar
1 tsp. ground cinnamon
½ tsp. freshly grated nutmeg
½ tsp. ground allspice
Zest of 1 lemon
Zest of 1 orange
1 vanilla bean, scored lengthways and seeds removed

Put the yeast in the bowl of a stand mixer with a tablespoon of the sugar and a tablespoon of the flour and mix in the warm milk. Put in a warm place for about 15 minutes until the mixture becomes frothy.

Next, put the rest of the sugar and flour, lemon zest, orange zest and butter into the bowl with the yeast mixture. Turn mixer on low to start bringing it together, then slowly speed it up, finally ending on a medium-high setting. Let the machine run until the dough begins to “slap” the sides of the mixing bowl and the dough looks smooth and silky. Then put dough into another bowl that has been lightly greased and cover with a clean damp kitchen towel and leave to rise for about an hour, or until it has doubled in size. When the dough has doubled in size, you can knock it back-this means you give it a bit of a punch to knock out some of the air so it can rise again later. This way your donuts will be light and fluffy. I actually did all this the day before, and then put the dough covered tightly into the refrigerator.

On a floured surface roll the dough out until it’s an even ½ inch thickness. Using a little cutter or small glass (approx. 2 inches in diameter) cut out about 25 little circles and pop them on to a greased baking pan to rise again, making sure there is sufficient gap between each one to allow them to spread. Cover with a damp tea towel and allow to rise for 45 minutes.

While you’re waiting for the doughnuts to rise, you can make the flavored sugar. Take all of the flavored sugar ingredients and mix thoroughly together; I used a mortar and pestle to break up the zest and vanilla seeds so that it would incorporate into the sugar. Put aside until after frying the doughnuts.


When the blobs of dough have almost doubled in size again, use a chopstick to make a little hole in the center of each doughnut. Now they are ready to be fried. Carefully heat the vegetable oil in a large deep saucepan. You can test the temperature by putting a leftover pea-sized piece of dough into the oil-if it sizzles and turns a golden brown after about a minute you oil is at the right temperature. Fry your doughnuts in batches. After about 2 minutes, when they are golden brown, carefully remove them with a slotted spoon, and place them on some paper towels to drain. While your doughnuts are still piping hot, sprinkle with the flavored sugar.


These are lovely eaten warm-feel free to pig out and eat them all in one go because they don’t keep very long.


Monday, November 23, 2009

it's that time

photo by Hannah Davidson

When I see chestnuts in the market, I know that it is definitely fall and the holidays are fast approaching. These lovely rich leathery brown beauties are the quintessential holiday treat. They conjure up an image of a roaring log fire on a cold frosty day and have been immortalized in a holiday song.

But admit it, most of you: You've never eaten a freshly roasted chestnut.

These meaty, slightly sweet nuts are wonderful in sweet or savory dishes. Chestnuts are a natural for poultry stuffing. They also can be made into cream of chestnut soup, chestnut bread or chestnut pasta; Roasted, boiled, braised or pureed with meat stock; or stir-fried. Chefs prefer to team them with Brussels sprouts, cabbage, mushrooms, onions, carrots or sweet potatoes.

Gourmets enjoy sweet confections such as maroons glaces (chestnuts that have been preserved in a sweet syrup), chestnut puree, chestnut cream, quiches, chestnut torte and chestnut ice cream. Of course, they can be roasted in a fireplace popcorn basket or special chestnut roaster.

When buying fresh chestnuts for roasting, choose those that are firm and heavy for their size, with smooth, glossy shells. Chestnuts are highly perishable. To keep them fresh, store them in a ventilated plastic bag in the crisper of your refrigerator or freeze them for later use.
The easiest way to roast chestnuts is to roast them in an oven. Rinse the chestnuts, then lay them on a towel and pat dry.

Using a strong, sharp paring knife to cut an “X” in the flat size of the chestnut shells. This prevents them from bursting, allows the steam to escape and makes peeling easier.

Place the prepared chestnuts in a single layer on a shallow baking pan. Roast at 375° for about 20 minutes. The sliced part of the shells will curl back.

Remove the chestnuts from the oven and place them in a towel-lined bowl. Wrap the towel over top to cover and keep them tightly covered for 5-10 minutes before removing the shells. Remove the shells while still hot, but cool enough to handle.

Starting at the slit, pull the shell away from the nutmeat. The inside skin will peel away from the chestnut along with the outer shell. If the inner skins do not come off easily, the chestnut is either undercooked or overcooked.

The best way to serve these is while they are still warm, either plain or dipped in melted butter with a sprinkling of salt or even cinnamon sugar would be yummy.

Enjoy!
Shannon

Sunday, November 22, 2009

for the love of chocolate


Imagine the best tart crust you can-buttery, flaky, and just a little sweet-and now imagine that it’s chocolate through and through. This crust is made the way a classic French tart shell is made: The butter is worked into the dry ingredients, the mixture is then moistened with egg yolk and water, and the dough is given a fraisage – the French term for a good working under the heel of your hand-to bring it all together.

When I hear that term I always think about the last massage I had at the spa….

Anyway, back to the dough. This crust has a full, fabulous flavor of chocolate that can be used to make the extravagantly rich Chocolate Truffle Tartlets, or to fill with pastry cream or crème fraîche and top with fruits. Or to create a grown-up ice cream pie, fill with superior ice cream and drizzle with a bittersweet chocolate sauce.

Is it time for dessert?

Enjoy!
Shannon


Chocolate Dough
Recipe by David Ogonowski
Makes enough for six 5-inch tartlets or one 10-inch tart

1 ¼ cups all-purpose flour
¼ cup unsweetened cocoa powder, preferably Dutch-processed
¼ cup sugar
¼ tsp. salt
1 stick (4 oz.) cold unsalted butter, cut into small pieces
1 large egg yolk
1 Tbsp. ice water

In a food processor fitted with a metal blade, put the flour, cocoa, sugar, and salt in the work bowl and pulse just to blend. Add the butter and pulse 8 to 10 times, until the pieces are about the size of small peas. With the machine running, add the yolk and ice water and process, in bursts, just until crumbly-don’t overwork it. Turn it out onto the work surface and, working with small portions, smear the dough across the surface with the heel of your hand.

Chilling the Dough: Gather the dough together and shape it into a rough square. Pat it down to compress it slightly, and wrap it in plastic. Chill until firm, at least 30 minutes.

Storing: The dough can remain in the refrigerator for 3 days, or it can be wrapped airtight and frozen for a month. Thaw the dough, still wrapped, overnight in the refrigerator before rolling it out.


over the top


Intensely, unmistakably, and irresistibly chocolaty. That I believe is the descriptor for these Chocolate Truffle Tartlets. These tartlets would be a welcome addition to any Thanksgiving dessert buffet, especially for those of us that believe chocolate is always in season and should have its own place on the food pyramid.

The chocolate pastry shell is a cross between a cookie crust and buttery, flaky pie dough, and the filling is a creamy bittersweet chocolate truffle concoction given crunch with cubes of milk chocolate, white chocolate and crackly biscotti. The tartlet (the name seems too small to contain the excitement this little package has to offer) is very sophisticated, elegant, and totally over the top.

So why not make a batch of these little beauties for the holidays. Even if you don’t serve them with the Thanksgiving festivities, they freeze very well and would be a great dessert to pull out in a pinch when those “unexpected” guests stop by.

Enjoy!
Shannon

Chocolate Truffle Tartlets
recipe by David Ogonowski

1 recipe Chocolate Dough, well chilled

5 Tbsp. unsalted butter, cut into 10 pieces
6 oz. bittersweet chocolate, finely chopped
8 large egg yolks
1 tsp. vanilla
¼ cup sugar
2 oz. white chocolate, cut into small dice
2 oz. milk chocolate, cut into small dice
4 biscotti, homemade or store-bought (you can use amaretti di Saronno), chopped

Line a jelly-roll pan with parchment paper and keep at hand. Remove the bottoms from six 4 ½-inch fluted tartlet pans (or use pans with permanent bottoms and just plan to pop the tartlet out once they’re filled, baked, and cooled); spray the pans with vegetable oil or brush with melted butter.

Cut the dough into 6 even pieces. Working with one piece at a time, shape the dough into a rough circle, then tamp it down with a rolling pin. Flour the work surface and the top of the dough and roll it into a circle about ¼- inch thick. As you roll, lift the dough with the help of a dough scraper to keep it from sticking. If the dough breaks (as it sometimes does), press it back together and keep going-it will be fine once it’s baked. Fit the dough into a tartlet ring, pressing it into the fluted edges and cutting the top level with the edges of the pan. Again, patch as you go. Use a pastry brush to dust off any excess flour and place the lined tartlet ring on the prepared baking pan.

Chilling the Crusts: When all of the shells are rolled out, chill them for at least 20 minutes.

Baking the Crusts: Center a rack in the oven and preheat the oven to 350°F. Prick the bottoms of the crusts all over with the tines of a fork and bake for 12 to 15 minutes, rotating the pan halfway through the baking time, until the crusts are dry, blistery, and firm. Transfer the baking pan to a rack so that the crusts can cool while you make the filling. Reduce the oven temperature to 300°F.

Making the Filling: Bring an inch of water to the simmer in a saucepan. Put the butter and bittersweet chocolate in a large metal bowl and place the bowl over the saucepan-don’t let the metal bowl touch the water. Allow the chocolate and butter to melt slowly, stirring from time to time, as you work on the rest of the filling. Remove the chocolate from the heat when it is melted and allow it to cool until it is just slightly warmer than room temperature.

Put the yolks and vanilla extract in the bowl of a mixer fitted with the whisk attachment or in a large mixing bowl. Using the whisk or a hand-held mixer, start beating the yolks at medium speed and them, when they are broken up, reduce the speed to low and gradually add the sugar. Increase the speed to medium-high and beat the yolks and sugar until the yolks thicken and form a slowly dissolving ribbon when the beater is lifted.

Spoon about one third of the yolks onto the cooled chocolate mixture and fold them in with a rubber spatula. Don’t worry about being too thorough. Pour the chocolate into the beaten yolks and gently fold the two mixtures together until they are almost completely blended. Add the cubed chocolates and biscotti, folding to incorporate the chunky pieces.

Baking the Tartlets: Using an ice cream scoop or ¼ cup measure, divide the filling evenly among the cooled shells. Smooth the filling with a small offset spatula, working it into the nooks and crannies as you circle the tops of the tarts. Bake the tarts for 10 to 12 minutes, until the tops look dry and the filling is just set. Remove to a rack to cool for about 20 minutes before serving.

Storing: Best the day they’re made, these are still terrific after they’ve been refrigerated—they lose their textual finesse, but the taste is still very much there. For longer keeping, wrap the tartlets airtight and freeze them for up to a month. Thaw, still wrapped, at room temperature.

Saturday, November 21, 2009

work cited

I have never been to a formal culinary school, my “school” has been over the years watching chefs/cooks such as Julia Child, The Frugal Gourmet, even Martha Stewart. I have attempted Martha’s Gingerbread house (multiple times). Although, admittedly they never looked quite as good as hers, I consoled myself in the fact that maybe they were “photoshopped” though they probably were not.

I would rather sit down and read a cookbook than a novel. My teachers have been James Beard, Alice Waters, Nancy Silverton, and Jamie Oliver just to name a few.

I have made many a mistake in my cooking efforts and have been known to get distracted, burn something and then end up getting Chinese take-out instead. It has been a work in progress, but one that I thoroughly enjoy.

In starting this blog, I’ve tried to give credit where credit is due on the recipes given and whether they were taken straight from the originator or slightly adapted. I know there are those chefs out there that like to keep some of their dishes a secret, and that’s fine I guess. But seriously it’s only food and what good is it if we don’t share it.

With that said, the following recipe is mine. But don’t give me too much credit, it came from trying other things like it and then just adding this or that or taking something out I didn’t care for in the dish. This is the type of recipe that you could throw most anything leftover from dinner the night before and it would turn out great.

So without further adieu…here is my version of a Savory Bread Pudding.

Enjoy!
Shannon

Savory Bread Pudding

1 day old French baguette, cut into 1-2 inch cubes
6 large eggs
2 cups ½ & ½ (or milk)
1 Tbsp. Dijon mustard
a dash of some freshly grated nutmeg
salt & pepper
½ lb. pancetta (have deli cut one large hunk)
2 shallots, sliced thinly
12 oz. asparagus, cut into 2 inch lengths
1 delicata or butternut squash cut into 1-2 inch dice
3 cups cheese grated such as smoked gruyere, Manchego, sharp white cheddar (or whatever you may have left in your fridge)
Olive oil

Heat oven to 375°.
Mix eggs, ½ & ½ (or milk), Dijon mustard, nutmeg and salt & pepper in a large bowl. Toss in bread cubes, let set while you prepare the rest of the ingredients.

Toss separately the asparagus and squash in olive oil and season with salt and pepper. Put asparagus and squash on separate sheet pans. Put in the oven and roast the vegetables until tender. The asparagus if thin won’t take very long, so watch it closely about 6-8 min. The squash will take about 25-30 min. until tender.

While the vegetables are roasting, chop the pancetta into ½ inch dice, put into a preheated sauté pan and let cook over medium heat until fat is rendered and they begin to crisp up, about 10 min. At that time you can add the shallots and cook together until the shallots begin to caramelize. Take off the heat.

Once the vegetables are finished roasting, let cool a bit and then add them to the bread mixture along with the pancetta and shallots. Toss in the grated cheese.

The pudding can then be placed in either a large casserole dish, or 4 individual 2 cup oven safe serving bowls or ramekins.

Bake for 30-40 minutes until the top turns a lovely golden color.
This is a nice side dish with a simple roasted chicken and some fresh lettuces dressed in a light vinaigrette.

Serves 4

Friday, November 20, 2009

dinner


I have never enjoyed shopping for my dinner more than in the last few weeks. The air is crisp…at least in the morning, and the farmer’s market stalls are groaning with root vegetables, cabbages, beets and potatoes. Apples are in abundance and are so juicy; the pears are still a little hard and would probably hurt your gums. I am still finding quince and even some sweet plump figs in small baskets tucked here and there. I also spotted some chestnuts that were quite large and firm, just ready for roasting. But what caught my eye are the squashes; the tiny crinkle-edged patty pans, the striped delicata, long-necked butternuts and others as fat and round as a football. I tend to prefer moderately sized fruit, squashes whose skins a thin enough to cut without resorting to an axe and small enough to bake within an hour. I usually make a soup of some kind or purée for a later use or simply roast them with butter and thyme.

A roast pumpkin is a side order rather than a main dish, though it would be lovely with brown rice and a thick tomato sauce, or incorporated into a savory bread pudding, even some caramelized sausages alongside would be a welcome combination for a cold night.

Enjoy!
Shannon

Roast squash with thyme

4 small to medium squash
2 Tbsp. butter
A glug of olive oil
Fresh thyme

Set the oven to 350°. Cut the squashes in half and scoop out the pulp and seeds from the center. Lay the squashes cut-side up on a baking sheet. Cut the butter into thin slices and put a slice in the center of each squash, together with a little olive oil, a good pinch of thyme leaves, a sprinkling of salt and plenty of freshly ground black pepper.

Roast for an hour, checking them occasionally to see how they are doing. You want them to be sweet smelling and the flesh to be totally tender when you pierce it with a knife.

Serves 4

Thursday, November 19, 2009

flavor notes


In Skye Gyngell's cookbook A year in my kitchen, she begins with talking about base notes & top notes; equating flavors to a musical scale, and is constantly seeking harmony-a balance of sweet, sour and salty tastes. This isn’t a new concept; it is the way people have cooked in the East for a very long time.

Like the notes on a scale-beginning with the earthy base note flavors and finishing with the top notes that add freshness and make a dish “sing”. At the top of the flavor scale you might have lemon zest, infused oils, and vinaigrettes as well as mayonnaise bases. Through the center you have agra-dolce (sour sweet), slow roasted tomatoes, toasted nuts. Approaching the bottom there might be more earthy flavors such as braised lentils, tea-smoked fish, stocks, and roasted spice mixes.

There are many different combinations of spices that work well together, from curries, garam masala, beau monde, Zahtar, five spice…on and on.

This particular combination of spices from Skye’s book is really nice, the flavors work particularly well together, lending a depth of flavor and aroma to many purées and slow-cooked dishes. They should be used in conjunction with other flavors in order to balance them out. The spice mix is a foundation that only really works if the heat of a chili is added, plus the sweetness of sugar or maple syrup, as well as the sourness of lemon or lime. Adding a salty touch is also needed to underpin the spice mix flavor.

Buy the spices whole for this, ready-ground spices will already have lost their freshness and give dishes a dull, musty taste. And for optimum flavor, use a pestle and mortar or spice grinder rather than a food processor to grind the mix. You can keep the roasted spice mix in a sealed container up to a month, but no longer.


Enjoy!
Shannon


Skye's Roasted Spice Mix
adapted from A year in my kitchen

1-2 cinnamon sticks
¼ cup coriander seeds
¼ cup cumin seeds
¼ cup fennel seeds
¼ cup mustard seeds
¼ cup fenugreek seeds
5 cardamom pods
2-3 star anise (or cloves)

Place a dry, heavy-based frying pan (preferably non-stick) over a low heat. Break the cinnamon stick in half. Once a clear smoke begins to rise from your pan, add all the spices and cook, stirring frequently, to toast them. Be careful not to burn them though, as this would give a bitter taste. Once the seeds begin to pop, they are ready. Remove from the heat and grind to a fine powder. Store in an airtight container until ready to use.

Wednesday, November 18, 2009

my submission


I recently heard about a contest that Bon Appétite magazine is having for bloggers. It is the Bon Appétit Blog Envy Bake-Off. Readers will vote for the tastiest-looking treats in each dessert category—cakes, cookies, pies, and more. The Bon Appétit Test Kitchen will bake the top scoring dessert in each category and select an overall winner. The winner will receive a trip for two to New York City and dinner with Bon Appétit Editor-in-Chief Barbara Fairchild and Restaurant Editor Andrew Knowlton.

Voting began Sunday, November 1st. Entries are rolling. The contest will end Sunday, December 13th.
If you would like to cast your vote for this entry or another just go to Bon Appétit Bake-Off

I have been searching through recipes finally landing on this Baba au rhum. A rum baba or baba au rhum is a small yeast cake saturated in liquor, usually rum, and sometimes filled with whipped cream or pastry cream. It is most typically made in individual servings 100ml-capacity dariole moulds, but sometimes can be made in larger forms similar to those used for Bundt cakes.

This particular recipe came from The Brasserie by Philippe Mouchel.  Chef Mouchel’s career has been stellar to say the least. He was raised in Normandy, and began his career at 16 at French Michelin starred restaurants such as Restaurant Roger Verge in Mougins, and it wasn’t long before he was working under the legendary French chef Paul Bocuse at his restaurant in Lyon. He traveled around the world opening one greatly acclaimed restaurant after another, before landing in Melbourne to open his most recent restaurant, The Brasserie by Philippe Mouchel, along the riverside at Crown Casino. Philippe’s fresh take on contemporary French cuisine has established the brasserie as a favorite among Melbourne’s dining set.

This lovely cake with the orange cream and citrus salad to me is a fresh twist on a very traditional holiday dessert.

Even if this doesn’t win the Bon Appétit Bake-Off challenge, it is a winner none the less.

Enjoy!
Shannon


Baba au rhum with Bitter Orange Cream and Citrus Salad

Cooking Time Prep time 35 mins, cook 45 mins (plus proving, soaking)

Ingredients

210 gm.  flour
¾ tsp. dried yeast
3 eggs
2 Tbsp. Butter, softened
1 tsp. honey
1 Tbsp. apricot jam

Citrus salad

300 gm. sugar
600 ml.  fresh orange juice
2 each of orange and grapefruit, peeled and segmented

Bitter orange cream

3 egg yolks
50 gm. Super fine sugar
25 gm. Flour
1 cup milk
125 gm. Fine cut orange marmalade
150 gm. whipping cream, whipped to soft peaks

Citrus syrup

250 gm. Sugar
1 orange and 1 lemon, rind removed with a vegetable peeler
1 vanilla bean, split and sees scraped
200 ml. Golden rum (or to taste)

Preheat oven to 350F. Combine flour, yeast and a pinch of salt in the bowl of an electric mixer fitted with a dough hook. Add eggs, butter and honey and mix until dough is elastic. Divide dough among 4 lightly greased 100ml-capacity dariole moulds, cover with a damp tea towel and stand in a warm place until double in size (30-40 minutes). Bake until golden and babas sound hollow when tapped (15-20 minutes). Remove from moulds and place in a shallow dish. Keep warm.

Meanwhile, for citrus salad, heat sugar in a frying pan over medium heat until dark caramel (10-15 minutes). Add juice (be careful as it will spit), bring to the boil and cook, stirring to dissolve caramel, until reduced by one third (5-10 minutes). Cool, add citrus segments, cover and refrigerate.

For bitter orange cream, whisk together yolks and sugar in a bowl until combined, then add flour and whisk to combine. Bring milk just to the boil over medium heat (5-7 minutes); gradually pour over egg yolk mixture, whisking to combine. Transfer to a clean saucepan and cook over medium heat, stirring continuously, until thick (3-5 minutes). Set aside to cool, then refrigerate until chilled. Stir in marmalade to combine and fold through cream. Cover and refrigerate until needed. Makes 2 cups.

For citrus syrup, combine all ingredients except rum in a saucepan. Cook over medium heat, stirring until sugar dissolves and syrup is warm (3-5 minutes). Add rum; pour over warm babas and turn frequently to soak in syrup until almost all is absorbed (10-15 minutes).

Meanwhile, combine jam and 2 tsp water in a small saucepan and stir over medium heat until jam dissolves. Brush over babas, and then serve with citrus salad and bitter orange cream.

Tuesday, November 17, 2009

the board

Family traditions are defined as the handing down of statements, beliefs, customs, information, etc., from generation to generation, especially by word of mouth or by practice.

We all have traditions of some sort…some we continue…some we lay aside. Thankfully my friend Carla shared with me a cherished family tradition that I am able to pass along to you.

Carla has a rich Italian background by way of her Sicilian grandmother (who apparently was a “pasta genius”). This little grandma would travel from back east to California when Carla was a young girl, and one of the things on the agenda when she was visiting was to make pasta. Pasta enough to last until the next time Grandma would hop on that plane for another west coast visit. But on Grandma’s first trek out west she said that there was one problem, she couldn’t make the pasta without her wood board; granite or marble would not do. So thanks to a handy young man in the family a wood board was produced. It’s nothing fancy, just a large piece of plywood with a stabilizing wood piece underneath so it would easily sit on top of any counter without moving. Now Grandma was happy, and so were all the hungry pasta recipients.

When it was time to make the goods, Grandma would roll up her sleeves and start mixing, kneading, rolling and cutting all kinds of glorious pasta. Within the fog of flour that would hang in the air, wonderful strands, pillows and sheets of dough would emerge. Everyone got involved; Carla was given the task and title of the “official gnocchi roller” with her famous finger flick style, the final shape for these beauties before they hit the water. And I would like to testify that to roll a gnocchi; especially Carla’s “finger flick” does take skill, of which I have yet to be proficient.

So even though I’m not related to Carla and am Scottish, (which is quite un-inspiring on the food front) I had the opportunity to learn to make Grandmas’ Sicilian style gnocchi. And since Carla brought over Grandmas’ board it made the endeavor even more special.

The result…the gnocchi turned out great. We scattered them on sheet pans and put them in the freezer to firm up before we put them into their respective containers. Thankfully we held a few back so that we could reward ourselves and sample our labor with a simple lunch of gnocchi with browned butter and sage.

They were delicious!

Enjoy!
Shannon


Carla’s Grandmas Amazing Gnocchi
This gnocchi recipe is a little different, in that it uses ricotta cheese as opposed to potatoes.

3-3 ½ cups all purpose flour (start with using 3 cups of the flour first, then add more as needed to get the right consistency)
16 ounces ricotta
2 large eggs, room temperature

Put all the ingredients into the bowl of an electric mixer fitted with the dough hook. Mix on low speed to pull everything together, slowly increase the speed. Let the mixer knead the dough until it begins to “slap” the sides of the mixing bowl. Feel the texture of the dough; if it is still a little sticky add more flour. The final result should be a smooth dough that isn’t sticky.

Put the dough out onto a lightly floured surface, pull off a knob of dough, about the size of a golf ball. Begin to roll out the dough into a long snake that is about a finger width in diameter. Then cut the snake into 1 inch pillows, lightly flour the gnocchi as you cut them. You can cook these as is or form them into the classic gnocchi shape with a gnocchi board, or the tines of a large fork turned upside down (or give Carla a call and see she if she’ll come over to do her famous “finger flick”style). Rest the bottom edge of the gnocchi board on the work surface, and then tilt it at about a 45 degree angle. Take each piece and squish it lightly with your thumb against the board while simultaneously pushing it away from you. It will roll away and around your thumb, taking on a cupped shape -- with ridges on the outer curve from the board and a smooth surface on the inner curve where your thumb was. (Shaping them takes some time and dexterity. You might make a batch just for practice.) The indentation holds the sauce and helps gnocchi cook faster.

As you shape the gnocchi, dust them lightly with flour and scatter them on baking sheets lined with parchment paper or waxed paper. Set gnocchi filled cookie sheets in the freezer for a few minutes to firm them up if you will not cook the gnocchi until the next day or later. Alternatively, you can cook them now, in a large pot of boiling salted water. They are done when they begin to float to the surface, about 5 to 8 minutes. Drain the gnocchi and toss with a little olive oil to keep from sticking. These are wonderful with a simple toss in some brown butter and crispy sage, or one of the ways Carla typically makes these is with a marinara sauce and meatballs.

Monday, November 16, 2009

at long last


This quince saga has come to a close. Thank goodness. The lesson learned: patience. You cannot rush the cooking of a quince, waiting for it to turn that lovely blood orange red color. I must tell you that out of the four different recipes I found they all said the final cooking time of the puréed mixture would take 1 hour. Well, mine took a little over 3 hours. Yes, it was a labor of love. I didn’t have to hover over the stove, but I didn’t go very far…checking email…load of laundry…etc.

So my ruby red squares of deliciousness have been packaged up neatly in parchment paper ready to be shared. The simplicity of this sweet treat paired with the traditional Manchego cheese is a wonderful beginning to a meal or even as a dessert course.

So for those of you that might be in possession of some quince or that are interested in giving this a whirl, here is the recipe I ended up using.

Enjoy!
Shannon


Quince Paste
From Simply Recipes

4 pounds quince, washed, peeled, cored, roughly chopped
1 vanilla pod, split
2 strips (1/2 inch by 2 inches each) of lemon peel (only the yellow peel, no white pith)
3 Tbsp lemon juice
About 4 cups of granulated sugar, exact amount will be determined during cooking

1 Place quince pieces in a large saucepan (6-8 quarts) and cover with water. Add the vanilla pod and lemon peel and bring to a boil. Reduce to a simmer, cover, and let cook until the quince pieces are fork tender (30-40 minutes).

2 Strain the water from the quince pieces. Discard the vanilla pod but keep the lemon peel with the quince. Purée the quince pieces in a food processor, blender, or by using a food mill. Measure the quince purée. Whatever amount of quince purée you have, that's how much sugar you will need. So if you have 4 cups of purée, you'll need 4 cups of sugar. Return the quince purée to the large pan. Heat to medium-low. Add the sugar. Stir with a wooden spoon until the sugar has completely dissolved. Add the lemon juice.

3 Continue to cook over a low heat, stirring occasionally, for 1-1 1/2 hours (or up to 3 in my case), until the quince paste is very thick and has a deep orange pink color.

4 Preheat oven to a low 125°F (52°C). Line an 8x8 baking pan with parchment paper (do not use wax paper, it will melt!). Grease the parchment paper with a thin coating of butter. Pour the cooked quince paste into the parchment paper-lined baking pan. Smooth out the top of the paste so it is even. Place in the oven for about an hour to help it dry. Remove from oven and let cool.

To serve, cut into squares or wedges and present with Manchego cheese. To eat, take a small slice of the membrillo and spread it on top of a slice of the cheese. Store by wrapping in parchment paper, foil or plastic wrap, and keeping in the refrigerator.

Sunday, November 15, 2009

slight digression


It has been quite an eye-opening experience this whole “blogging” thing. My limited computer skills have come up a notch, be-it-ever-so-slightly, and my favorite food blog sites are increasing as well.

There are some truly beautiful food blogs and some remarkably talented people out in cyber space. One in particular that is new to me, but I am enjoying very much is not without salt. Besides being a talented photographer, and chef, her writing is a joy to read. It was actually from her site that I heard about the National Blog Writing Month (nablowrimo) as well as another project called Food A-Z. Food A-Z is a vehicle where we can practice our photography skills with the help of a weekly assignment. We are using the alphabet as a guide and are just finished with “B”. I thought I would share my final submission with you…a Brussels sprout stock. Now I’m on to “C”.

Stay tuned,
Shannon

P.S. In case you’re wondering, the quince paste is resting nicely. It will have its photo op tomorrow.

Saturday, November 14, 2009

the confession


I have a confession to make. The quince paste I was in process of making yesterday turned out to be a nothing but a mound of goo. What a waste. It was totally my fault, I was trying to hurry it along before I had to head off to work (work is really getting in the way of my blogging efforts). But anyway, the quince had been simmering until fork tender, put through a food mill, and then back to the stove to get finished off. The recipe said it might take up to 1 hour. “Perfect” I told myself. I had exactly 1 hour until I needed to head off to work. I stayed by the stove faithfully stirring the mushy mixture waiting for that final moment when it was supposed to turn that beautiful deep ruby-red color (it still looked like applesauce at this point). I stirred. And stirred. And stirred some more. The hour was almost up and I was debating about calling into work, telling them I would be late because my quince paste hadn’t turned the right color yet, but thought better of it. I was desperate. What to do?

Well, thankfully my sweet husband works out of the house and at that particular moment was on a conference call. I wrote down all the instructions as best as I could and stuck it under his nose. He looked up and I got the raised eyebrow. But the darling hubby that he is put on the headset and took up the spoon and tried his best to follow my cryptic note.

Even after the length of time I told him it would take and all his faithful stirring, it still didn’t turn that deep crimson color or become the sticky blob it was supposed too. Sadly, I had to dump it.

But today is a new day, and I still had some quince left (thanks to my compulsive over buying weakness). I found another recipe that had some beneficial tips that I am hoping will give me the success I so desire. Even now as I’m typing, the house smells lovely with the apple-pear perfume that the quince give off, and the last time I checked they were starting to turn into a rosy shade of pink. I’m hopeful.

So if all goes well, I will have success from all of this effort, and will gladly share the results.

By the way, if your wondering why the picture of the vanilla bean. The new recipe I’m using for the quince paste calls for a vanilla bean in the simmering liquid. I got distracted and started taking photos of it…

Until tomorrow,
Shannon

Friday, November 13, 2009

further developments

It's annoying to come across a recipe raving about the taste or beauty of something exotic or unattainable. I first heard about quince from the renowned Australian Le Dame D’Escoffier Maggie Beer. She makes an awesome quince paste that is imported from Australia that I found in a nearby specialty food shop. It is a reddish jello-like block or firm reddish paste. Once I tried it I was hooked. It is typically eaten in sandwiches or with cheese, traditionally Manchego cheese, or accompanying fresh curds and is delicious. The sweet , floral notes of the quince paste contrasts nicely with the tanginess of the cheese.

Although not everyone can find quince in their local market, they're not necessarily all that hard to track down. I actually found some at a Whole Foods market not far from my home. There were only a few, stuck in an odd spot off to the side. They look like a strangely deformed pear, and actually they are related to apples and pears. The immature fruit is green with dense grey-white kind of “fur”, most of which rubs off before maturity in late autumn when the fruit changes color to yellow with hard, strongly-perfumed flesh.


Most varieties of quince are too hard and sour to eat raw; mostly they are cooked before eating. They are used to make jam, jelly and quince pudding, or they may be peeled, then roasted, baked or stewed The very strong perfume means they can be added in small quantities to apple pies and jam to enhance the flavor. Adding a diced quince to apple sauce will enhance the taste of the applesauce with the chunks of relatively firm, tart quince.

Quinces aren’t all that easy to prepare. But like most things that we so desperately want, they take time and patience, and they take work. They are pretty darn hard to cut so be careful. They are about as hard as a pumpkin to get into, so it might be a good idea to steady it on a kitchen towel while preparing to stabilize it a little.

I have been baking, simmering and poaching quince this week, so stay tuned.  Who knows what will turn up.

Enjoy!
Shannon

Thursday, November 12, 2009

Eureka!


I don’t know if I can count how many times that I’ve been to Ramos House Café and have seen this Bloody Mary delivered to some other diners’ table.  It seems to always get the “oohs” and “aahs” when it goes by.

Now it’s very rare for me to have alcohol of any kind…so you know I’m not a big drinker. It’s the whole presentation of this drink that I think is so cool. They make their own pickled green beans and have those along with an herb salad and a crab claw stuffed in the top of the glass.

I’m usually content with either the typical iced tea with lunch or the yummy latte with breakfast, or on those “I really need some sugar” days, their amazing mocha topped with a torched homemade marshmallow, I haven’t had the Bloody Mary. But this particular day when having a sit down with a friend, I reached into my coat pocket and found some cash I had unknowingly put in there who knows when. I was so excited; I think I may have clapped my hands (to the shock of my lunch date). I determined because of this fortuitous find it was the day to order that Bloody Mary for myself. No more living vicariously through those other diners.
Thankfully because I’m so obsessed with taking pictures of my food (also, probably to the chagrin of my lunch date) I had my camera with me to capture it in all it’s glory.

So, here it is kids that amazing looking Ramos House Bloody Mary.

Cheers!
Shannon

Bloody Mary
From the Ramos House Café
1 liter Clamato
Vodka or Soju
1 Tbsp. prepared horseradish
2 Tbsp. wild hot sauce
1 Tbsp. black pepper
1 Tbsp. Worchester sauce
1 Tbsp. lemon juice
Zest of 1 lemon, blanced
1 clove garlic
¼ cup pitted green olives, chopped
Salt to taste

Except for the vodka, place all ingredients in a blender or food processor and puree. Fill a glass with ice and add desired amount of vodka. Fill remainder of glass with Bloody Mary mix.

Garnish with: Pickled green beans, Crab claw, Herb salad, Diced bell peppers.

Wednesday, November 11, 2009

lunch with Teri


There are a few people in my life that I really enjoy spending time with. Unfortunately, because of schedules it doesn’t happen as often as I would like. One of these people is my friend Teri. We have known each other for more years than I want to admit, but even if we haven’t talked or got together in a while we can still pick up right where we left off. It's that kind of comfortable, cozy slipper, wrapped up in a blanket kind of friendship.

On the flip side, she is a creative genius in many ways and when we have an opportunity to do something creative together, whether it is design or food related…stand back! We sort of feed off of each other and when those creative juices start pumping just watch out. Who knows what is going to happen…although the end result is usually quite satisfying.

I put a call into her not so long ago, putting in a request for a lunch date at one of my favorite places to eat in my hometown San Juan Capistrano. It’s called Ramos House. The idea of the restaurant/ house is simple; like the old days, its owner lives and works at the house, the wines are kept in the cellar, the herbs are grown in the garden and the ice cream is turned out back. The menu changes daily and everything is made from scratch.  I have probably eaten everything on the menu, or close to it.

This particular day sitting out on Ramos’ covered patio, it was a little cool. Although I was sitting next to the wood burning stove with one of the provided blankets on my lap, I wanted something warm. The Corn Chowder with Truffled Popcorn was the ticket.

Thankfully, for both you and me John Q. the chef/owner has published his cookbook Ramos House Cafe: Recipes from the first 5 years  so I am able to share this recipe with you.

I did make this at home and it was just as good…although it would have been better if Teri were there.

Enjoy!
Shannon


Corn Chowder
From the Ramos House

10 ears of sweet white corn
1 yellow onion, diced (1 cup)
¾ cup butter
¾ cup masa harina (corn flour)
½ cup diced red bell peppers
1 bunch scallions, thinly chopped
½ cup celery, diced
1 Tbsp. chipotle chilies, pureed
1 cup white corn hominy
1 tsp. dried oregano
1 tsp. garlic, minced
1 tsp. fresh chopped thyme
1 russet potato, diced into ¼ inch cubes

Freshly popped corn
Truffle oil (optional)

Method:
Cut kernels from the cobs and set aside. Place corn cobs in a large stock pot and cover with water (approx. 8 cups). Bring water to a boil, reduce heat and simmer for 1 hour. Remove from heat and strain the corn stock through a sieve, discarding the cobs and reserving the liquid.

In a separate stock pot, melt butter over medium heat. Add masa harina and incorporate using a whisk. Stirring constantly over medium-low heat, cook the masa roux for approximately 5 minutes. Add onions, peppers, celery, garlic, scallions, oregano, thyme, chipotles, and reserved corn kernels. Stir to coat the vegetables with roux. Cook for 5 more minutes over medium, stirring occasionally to avoid scorching the bottom of the pot. Add corn broth and remaining ingredients, bring to a simmer. If soup seems too thick, add water, chicken stock or vegetable stock. Reduce heat and simmer for 20 minutes or until potatoes are tender. Taste and season with salt and pepper. Top off with some freshly popped corn and drizzle on some truffle oil.

Serves 6 -8

Tuesday, November 10, 2009

special delivery


As I mentioned in my post yesterday, my hubby and I took a day trip up the coast to see my daughter at college. One reason for the visit was to bring some encouragement. The other reason, at my daughter’s specific request, was to bring chocolate, in the form of these outrageously dense, gooey, sinfully delicious brownies.
Now the actual label for these illustrious brownies by Rick Katz is “Best-Ever Brownies”. Now this might sound a little prideful. There are many tasty brownie recipes out there, but I must say, these are pretty darn awesome. For me, it is all about the chocolate. In this recipe, the brand of chocolate is not specified…but my chocolate of choice in baking is Valrona.
Now those who are passionate about brownies argue in defense of their favorite type, cakey or fudgey. If you’re a cakey fan, go on to another recipe. These are the epitome of soft, dark, baked-just-until-barely-set brownies. Their creamy texture makes them seem wildly luxurious and very much a treat to be meted out in small servings.
The mixing method is a bit unorthodox for a brownie. Half of an egg-sugar mixture is stirred into the melted chocolate and butter, while the other half is whipped until it thickens and doubles in volume. The lightened eggs are folded into the chocolate with a delicate touch, as are the dry ingredients…tricks that enhance the brownies’ lovely texture.

Enjoy!
Shannon


Best-Ever Brownies
by Rick Katz

1 ¼ cups sifted all-purpose flour
1 tsp. salt
2 sticks (8 ounces) unsalted butter
4 ounces unsweetened chocolate, coarsely chopped
2 ounces bittersweet chocolate, coarsely chopped
2 cups sugar
1 tsp. pure vanilla extract
4 large eggs

Center a rack in the oven and preheat the oven to 350°.
Sift the flour and salt together and set aside.
Melt the butter and chocolate together in the top of a double boiler over, not touching, simmering water. Add 1 cup of the sugar to the mixture and stir for half a minute, then remove the pan from the heat and stir in the vanilla. Pour the mixture into a large bowl.
Put the remaining 1 cup sugar and the eggs into the bowl of a mixer with the whisk attachment and beat until just combined. Little by little, pour half of the sugar and eggs into the chocolate mixture, stirring gently but constantly with a rubber spatula so that the eggs don’t set from the heat.
Whip the remaining sugar and eggs until they are thick, pale and doubled in volume, about 3 minutes. Using the rubber spatula, delicately fold the whipped eggs into the chocolate mixture. When the eggs are almost completely incorporated, gently fold in the dry ingredients.

Baking the brownies
Pour and scrape the batter into an unbuttered 9 inch square pan. Bake the brownies for 25 to 28 minutes, during which time they will rise a little and the top will turn dark and dry. Cut into the center at about the 23-minute mark to see how the brownies are progressing: They’ll be perfect if they’re just barely set and still pretty gooey. They’re still awfully good on the other side of set, so don’t worry if you miss the moment on your first try. Cool the brownies in the pan on a rack. Cut into 1 ½ by 3-inch bars to serve.

Storing
The brownies will keep, covered, for 2 to 3 days at room temperature and can be frozen for up to a month. Thaw still wrapped, at room temperature. These never freeze solid, so you might want to think about using them as a mix-in for ice cream.

makes 18 brownies

Monday, November 9, 2009

keeping up

I must say that participating in the NaBloWriMo this month has brought to the surface a few areas in my life where I am falling a little behind. If we were to list out all of the things that fall into the category of “keeping up” what would they be? Mine would probably be paying bills, laundry, and blogging, just to name a few. I’m sure I am not alone in this. We are probably all too some degree trying to keep up. Many of these require some basic organization (easier said than done I find).


There is also another element of “keeping up” that I didn’t realize I was “falling behind” in, which is proper or current word usage. Thank goodness for my college age daughter and friends (whom I adore) to fill me in on this little matter. Yes, apparently this 40 something lady uses some goofy words. It happened yesterday, as my hubby and I took a day trip up to see her in Santa Barbara (homemade brownies in tow no less). When one of these “words” came out my daughter and friends would begin laughing. Now, I do try to take things lightly and like to joke around, but this wasn’t a joke. It was my choice of words that seemed to give them a giggle. They told me it “was cute”, but honestly now I’m paranoid. Perhaps instead of purchasing another cookbook I should look into buying a thesaurus, this might be a good idea.

So today to give myself a little encouragement, that yes in fact I can actually keep up in other areas. I decided to give the dog a bath, vacuum and dust in record time. I pulled out of the freezer some pumpkin puree that I had made a while back for a quick dinner of some simple roasted chicken and pumpkin risotto. So you see, a little planning ahead on roasting those pie pumpkins made a quick and easy dinner option.


My gracious… if this doesn’t sound like keeping up I don’t know what does.


Enjoy!
Shannon


Pumpkin Puree
4 small pie pumpkins

Cut the pumpkins in half carefully with a heavy sharp knife.  Scoop out the seeds and pulp (reserve seeds for another use).
Place pumpkin halves face down on a jelly roll pan and cover with foil.  Stick in a preheated 375°F oven and roast for about an hour until tender.  Place the pan on a rack until cool enough to handle.  Then scoop out the flesh and put in a food processor.  Puree until smooth.  Place in airtight containers or freezer bags.  The puree should be fine in the freezer for up to a year.

makes about 6 cups