Thursday, February 18, 2010

a cup of tea


If we drink coffee to get us up and moving, we drink tea to wind us down. So it should come as no surprise that there are health benefits in the consumption of tea. Many scientists agree that tea; both black and green contain important antioxidants and contribute to a healthy lifestyle.

But did you also know that tea like wine can be paired with foods to enhance your baking, cooking, and your dining. And this recipe is proof that tea and cake definitely go together. I came across this recipe in my ever expanding file of “things to make” and decided it was time to get baking.

The recipe, a dense chocolate cake that has an infusion of earl grey tea could be served easily for brunch, afternoon tea, or for dessert.

Produced in Sri Lanka, China and India, Earl Grey is traditionally scented with bergamot oil, which gives it an orange-citrus flavor. And when paired with rich dark chocolate it can’t be beat.

Enjoy!
Shannon


Chocolate-Earl Grey Cake
Adapted  from a recipe in Real Simple Magazine 2007

6 Earl Grey tea bags or 2 Tbsp. loose Earl Grey
1 cup water
½ cup (1 stick) unsalted butter, room temperature
3 eggs
2 cups granulated sugar
4 ounces unsweetened chocolate, melted and cooled
2 cups all-purpose flour
1 tsp. baking soda
1 tsp. baking powder
¼ tsp. kosher salt
½ cup crème fraîche
Confectioners’ sugar, for dusting

Heat oven to 350°F. Coat an 8-cup fluted tube pan with cooking spray. Brew the tea in the water 3 to 5 minutes. Remove the tea bag or strain the leaves and set the brewed tea aside. Sift together flour, baking soda, baking powder and salt together, set aside. Using a mixer, beat the butter, eggs, and granulated sugar until fluffy. Blend in the chocolate. Beat in the flour mixture, crème fraîche and brewed tea. Pour into pan and bake 50 minutes, or up to an hour, until a cake tester comes out with a few crumbs attached. Remove from oven and let cool for 5 minutes, then turn out of pan and cool.  Dust with confectioners’ sugar.

Makes 10 servings

Tuesday, February 16, 2010

double decadence


Knowing my daughter was going to be home from college this past weekend and also knowing that she is pretty over the top regarding anything chocolate, especially dark chocolate. I decided to make a rich dark chocolate ice cream that has, not only one, but two types of dark chocolate.

The lush, luxurious texture of this dense chocolaty ice cream has a hint of Frangelico liquor as well as some roasted hazelnuts that provide a wonderful crunch.

Serve a couple scoops of this chocolate decadence drizzled with extra-melted chocolate and top with a maraschino cherry, if you like.

Enjoy!
Shannon

p.s.
She went back to school today...the ice cream container is empty.


Double Decadence
Serves 10

9 egg yolks
1 cup sugar
Scraped seeds of 1 vanilla bean or 1 tsp. vanilla paste
2 Tbsp. Frangelico
8 ounces good quality dark chocolate, melted
2 Tbsp. Dutch-process cocoa, sieved
2 ½ cup whipping cream
8 ounces crème fraîche or sour cream
1 cup roasted hazelnuts, skins removed, coarsely chopped
Maraschino cherries (optional)

Whisk yolks, sugar, vanilla seeds and Frangelico in a heatproof bowl over a saucepan of simmering water until mixture is tripled in volume, thick and pale and holds a ribbon (4-5 minutes).

Remove bowl from heat and continue whisking until cooled (2-3 minutes). Add chocolate and cocoa and mix to combine.

In another bowl whisk together cream and crème fraîche until blended. Add to the chocolate mixture. Pour into a container, cover and refrigerate at least 2 hours or overnight.

Freeze mixture in an ice cream maker for approximately 20 minutes, it will still be quite soft. Add the chopped hazelnuts right at the end, just until mixed through. Then transfer to an airtight container and put in the freezer to firm up.

Sunday, February 14, 2010

love stories

photo by Hannah Davidson

What makes a couple perfect? Do you think of the tragic love story of Romeo & Juliet, or perhaps the happily ever after Cinderella & Prince Charming? Chemistry differs with ideal partners-whether star-crossed lovers or kindred spirits, the bottom line is that they bring out the best in each other.

And this couldn’t be truer than in home cookery, where opposites attract: crisp, salty bacon with soft, mild farm-fresh eggs; sweet honey with the tannins of tea or a thinly sliced piece of prosciutto wrapped around a juicy sweet slice of cantaloupe.

There are also some culinary couples that just go together: Where would spaghetti be without meatballs, berries without their cream, or espresso without steamed milk?

Present a plated (or a mug) to a sweetheart today, enjoying a tradional rendition or creative interpretation, then let your self fall in love all over again.

Enjoy!
Shannon

Tuesday, February 9, 2010

morning pastries


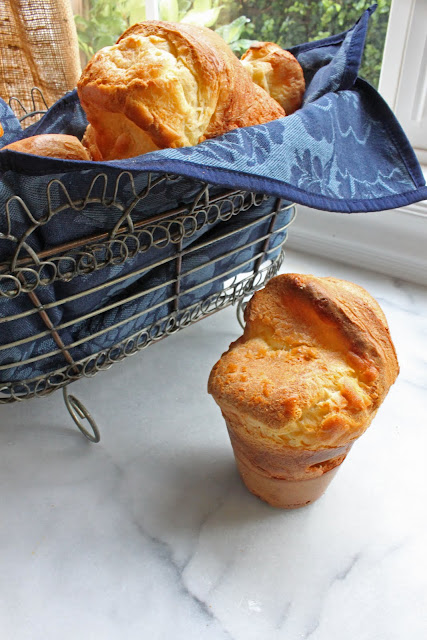
In busy times, few things make us feel as pampered as a leisurely breakfast with homemade pastries. Muffins and scones are familiar as well as croissants that are either left plain or plumped with chocolate or almond cream. Then there are the various fruit filled Danish, in pockets, pinwheels, and braids. But probably none inspire a smile more than the popover.

With their puffing power and magical appeal, many of us have fond memories of these delightful treats. I can’t think of anything that could be better, than a warm popover, fresh from the oven, bathed in butter and honey. These are so simple to make and end up beautifully puffed with golden crowns, crispy crusts, and custardy interiors.  This recipe should be all the encouragement you'll ever need to rise, and bake!

Enjoy!
Shannon


Popovers
recipe by Marion Cunningham

1 cup all-purpose flour
1 cup whole milk, at room temperature
½ tsp. salt
3 large eggs, at room temperature
2 Tbsp. unsalted butter, melted

Melted butter for greasing the popover cups

Position rack on the lowest rung of the oven and preheat the oven to 425°F. Butter or spray popover pan cups. Or alternately you can use ¾ cup glass custard cups or ten ½ cup muffin cups. If you are using custard cups, place them on a jelly roll pan, leaving space between each cup. If you’re using muffin pans, you’ll need to use two 12-hole muffin tins because, to give the popovers ample air circulation, you won’t be filling all of the holes.

Pour all of the ingredients into the container of a blender and whirl until smooth. Strain batter. I sometimes make these ahead to this point and then store in the refrigerator to make the next day.

Baking the popovers:

If using a popover pan pour in batter up to the half-way point. For the custard cups, pour 1/3 cup of batter into each cup, dividing any extra batter among the cups. For the muffin cups, use ¼ cup of batter for each cup, filling alternate cups in each tin so that every popover has puffing space. Bake, without opening the oven door, for 25 minutes, until the popovers are puffed, nicely browned, and crisp on the exterior. Turn the temperature down to 350° and bake for another 15 to 20 minutes to help dry out the interior, which no matter what you do, will always be a little doughy in the center. Serve immediately.

Storing:

Popovers are at their puffiest right out of the oven. You can hold them at room temperature for a few minutes, or wrap them airtight, freeze them for up to a month, and reheat them in a 350°F for 10 to 15 minutes, and they’ll taste good-but never as good as fresh baked.

Monday, February 8, 2010

sunday dinner


After reading a recipe for Chicken with Olives by Lidia Bastianich from her cookbook Lidia Cooks From the Heart of Italy, it reminded me of a recipe that I’ve been making for years from the Silver Palate Cookbook called Chicken Marbella. Chicken Marbella not only includes the brine cured green olives like Lidia’s but also has the distinctive flavors of prunes and capers, the combination of which has long been a family favorite. The only draw back on the Silver Palate recipe is that I have to be slightly more organized in my meal planning because the recipe requires overnight marinating.

So for years I have obeyed, not wanting to deviate in the least bit in fear of dry, un-flavorful chicken. Well, I believe I have found a happy medium in following the process in Lidia’s recipe but using the ingredients I’ve come to love from the Silver Palate girls. It must have been skillet simmering that did the trick, turning butter, wine, garlic as well as the capers, olives and prunes into a sauce that tasted, and smelled, as if it had been hours in the making. I served it in shallow bowls, so that every last drop of the flavorful sauce could be sopped up by a crusty french loaf. The result: moist and delicious. Plus, it was a pretty quick throw together for a simple Sunday dinner.

Enjoy!
Shannon

Chicken Marbella My Way
Serves 4

1 3-4 lb. chicken, cut up into 10 pieces
1 tsp. kosher salt
2 Tbsp. extra-virgin olive oil
2 Tbsp. unsalted butter
5 garlic cloves, peeled and slightly smashed
4 bay leaves, preferably fresh
1 cup brine-cured green olives
1 cup pitted prunes
¼ cup capers with a bit of juice
½ cup brown sugar
1 cup white wine

Rinse the chicken pieces, and pat dry with paper towels. Trim off excess skin and all visible fat. Cut drumsticks off the thighs; cut breast halves into two pieces each. Season chicken all over with salt.

Put olive oil and butter in the pan, and set over medium-low heat. When the butter is melted and hot, lay in the chicken pieces, skin side down, in a single layer; drop the garlic cloves and bay leaves in the spaces between them.

Cover the pan and let the chicken cook over gentle heat, browning slowly and releasing its fat and juices. After about 10 minutes, uncover the pan, turn the pieces, and move them around the pan to cook evenly, and then replace the cover. Turn again in 10 minutes of so and continue cooking covered.

After the chicken has cooked for 30 minutes, scatter the olives, prunes and capers onto the pan bottom, around the chicken. Sprinkle the brown sugar over the top of the chicken pieces and pour wine around each piece. Raise the heat so the liquid is bubbling, cover, and cook, gradually concentrating the juices, for about five minutes.

Remove the lid and cook uncovered, evaporating the pan juices, occasionally turning the chicken pieces gently until the pan juices thicken and coat the meat like a glaze.

Turn off heat and serve the chicken right from the skillet, or heap the pieces on a platter or in a shallow serving bowl. Serve with a loaf of crusty bread for sopping up every last wonderful drop.

Thursday, February 4, 2010

carb fix


I shouldn’t be surprised that when I picked up Nancy Silverton’s cookbook on Pastries from the La Brea Bakery that I would have to make some additional trips to the gym to work off all of the calories I’ve been taking in this week. But I will tell you…it was worth it!

I have made a few recipes from her book these past few days, as well as flagged many more that I will be trying out, but I have to share this one in particular.

Parmesan scones.

These little biscuit-like savories are so light and buttery, they almost melt in your mouth. The rich nutty, slightly salty flavor of the parmesan carries the scone to new heights. The crème fraîche adds a slight tang and the chives, which not only look great with their flecks of green throughout the dough, also give a subtle onion-garlic flavor note. Whether served next to a humble roast chicken for dinner, paired with smoked salmon for lunch or served as an appetizer with prosciutto and fig jam, they are, dare I say “yumm-o.”

An optional addition that my friend Angie suggested was to put in a little crisply cooked applewood smoked bacon that had been crumbled into small pieces. I did try it…and yes, they were awesome!

Enjoy!
Shannon


Parmesan Scones
from Nancy Silverton’s Pastries from the La Brea Bakery

special item: 1 ½ -inch round cutter

2 ¾ cups unbleached pastry four or unbleached all-purpose flour
1 Tbsp. plus 1 tsp. baking powder
2 tsp. kosher salt
¾ cup (3 ounces) grated Parmesan Reggiano cheese
1 stick plus 1 Tbsp. (4 ½ ounces) unsalted butter, cut into cubes and frozen
½ cup (about 1 ounce) minced chives
1 cup crème fraîche or sour cream

For the topping:
2 Tbsp. (1 ounce) unsalted butter, melted
2 Tbsp. grated Parmesan Reggiano cheese
1 tsp. fresh cracked black pepper

Adjust the oven rack to the upper position and preheat the oven to 400°. In the bowl of a food processor fitted with the steel blade combine the flour, baking powder, salt, cheese and process or mix on low to incorporate. Add the butter and pulse on and off a few times, until it’s the consistency of a fine meal.

Transfer the mixture to a large bowl, and toss in chives, and make a well in the center. Add the crème fraîche and using one hand draw in the dry ingredients, mixing until just combined. The mixture will be a bit dry and crumbly.

Wash and dry your hands and dust them with flour. Turn the dough out onto a lightly floured work surface and gently knead a few times to gather it into a ball. Roll or pat the dough into a circle slightly thicker than a ½ inch. Cut out the circles, cutting as closely together as possible and keeping the trimmings intact.

Gather the scraps, pat and press the pieces back together and cut out the remaining dough. At this point Nancy suggests placing the circles in groups of three, with the edges touching to form a clover shape, and then placing 1 inch apart on a parchment-lined baking sheet. (I choose to bake these individually to use as an appetizer portion.)

Brush the tops with the melted butter. Sprinkle with a pinch of the Parmesan and a few grindings of fresh black pepper.

Bake for 20-25 minutes, until firm to the touch and lightly browned.
In case you want to make up an extra batch of these beauties, I found that they freeze very well. Just follow all of the steps through cutting them out, then freeze in airtight containers or plastic bags.  When you are ready to bake, brush with melted butter and top with Parmesan and pepper, bake as directed.


Yield: 16 scones

Tuesday, February 2, 2010

food photography online course giveaway


If you have ever wanted to learn about food photography, or are wanting to improve on those skills for a blog or portfolio there is a great opportunity for you.

The Picture Perfect School of Photography is offering an introductory online food photography course and is giving away a spot to one lucky winner. The online food photography class is taught by professional photographers Ron Goldman and Kathleen Clemons. You will learn how to create beautiful awe inspiring photographs as well as learn some great techniques. If you have ever wanted to take a photography class but can’t find the time to get out of the house to attend one, then this online class is perfect for you and easy to take!

Sally Cameron is hosting the give-a-way on her blog and all the details are explained there. Leave your comment to enter on her blog. Comments left on this post do not count as part of the give-a-way.

So hurry, the giveaway ends on February 14th, so head over to Sally's site and enter your name and comment there.

Good luck!
Shannon

Monday, February 1, 2010

a word on "curd"


The word “curd” has never sounded very appealing to me. But when the word “lemon” is in front of it, well that’s another story. It’s then that my jaw tightens and my glands begin to salivate anticipating that something tasty is on the horizon.

Lemon curd, with its silky smooth and tart creaminess is hard to resist. Put into a crepe, or between layers of a decadent yellow cake it has outstanding results. It is wonderful on a warm blueberry scone, a waffle hot off the griddle or my preferred vehicle for enjoying lemon curd… a spoon.


I have been a little compulsive lately with Meyer lemons. They are in season right now and I’ve been like a mad scientist in the kitchen using them in this and that.

The fruit of the Meyer lemon is yellow and rounder than a typical lemon we can find in the markets year round (such as the Eureka or Lisbon). It has a slight orange tint when ripe and is sweeter and less acidic in flavor. The flowers of the Meyer lemon are white with a purple base and are quite fragrant. This is the time of year here in Southern California that the citrus trees are loaded down with fruit and the fragrances of the blossoms are intoxicating.


Even if you cannot find Meyer lemons in your area, you could use the typical Eureka lemon or whatever is available and add some fresh squeezed orange juice at a ratio of 1 part orange juice to 3 parts lemon juice to get a similar taste to the Meyer. Either way, making your own lemon curd is easy and worth the effort. The results are so much better than what you can buy in a jar.

Enjoy!
Shannon

Lemon Curd
Recipe by Karen Solomon from the book jam it, pickle it, cure it

Prep ahead: You will need clean jars to store your bounty. Make sure they are free of rust and odors and the lids seal tightly. Prepare a label that lists the contents and date prepared.

6 eggs plus 1 egg yolk
1 cup sugar
1 ½ cups freshly squeezed lemon juice (from about 12 lemons)
10 tablespoons butter, cut into small pieces
Zest of 2 lemons, removed in large pieces with a vegetable peeler

In a large saucepan, with a whisk, beat the eggs and egg yolk thoroughly, then whisk in the sugar and lemon juice. Stir together until thoroughly combined. The sugar should be completely integrated into the liquids, which will result in a much creamier curd. Place the pot over medium heat and gently warm the mixture. After 3 minutes, add the butter and the zest pieces. Whisk constantly for 7 to 8 minutes, until the butter melts and the mixture becomes very thick.

Pour the curd into a clean glass jar and let it cool at room temperature, uncovered. Remove zest and discard.

Serve warm or refrigerate, in a covered glass jar, up to 10 days.

Makes about 2 cups