Showing posts with label sweets. Show all posts

Wednesday, February 9, 2011

i won what?


When Ally, a marketing coordinator for Condé Nast contacted me via email to say that I had won the Epicurious Farm Fresh Recipe Contest I was skeptical.   My first thought was that this was some sort of “your name has been entered into a drawing” sort of thing or that it was a marketing promotion.  And honestly, I didn’t even remember entering any contest for Epicurious. But after a little research sure enough it was legit. And the winning recipe was for my Rhubarb & Strawberry Crisp.

After a little back and forth communication with Ally, I thought for sure that this award would catapult me into some sort of rhubarb hall of fame…or that maybe Bobby Flay was going to fly to Orange County and personally hand me my check and with his camera crew in tow wanting to challenge me to a rhubarb crisp throw down.


Sadly, my check arrived with little pomp and circumstance.  But my check did arrive none the less.  And it is going into the fund for the “eating my way through Paris” this spring with my daughter.  So for that I’m very grateful.

So just in case you’d like to make this Farm Fresh Recipe Challenge Winning Recipe here it is (drum roll please!)

Enjoy!
Shannon

Rhubarb & Strawberry Crisp
Serves 8

1 lb. rhubarb, sliced in 1 in. pieces
2 pints strawberries, hulled, sliced in half
Zest and juice from 3 blood oranges (or whatever oranges you have on hand)
¼ cup flour
¼ cup sugar
Topping:
1 stick butter, chilled, cubed
¾ cup all purpose flour
½ cup brown sugar
½ cup oats
Pinch of salt
¼ cup toasted hazelnuts, skins removed, chopped coarsely

Preheat oven to 350°.  Grease an 8 x 11 baking dish and set aside.  In a bowl combine sliced rhubarb, strawberries, zest and juice from the oranges, flour and sugar.  Toss gently to incorporate flour and sugar throughout.  Pour into prepared baking dish.
For the topping I like to use a food processor, but a pastry cutter, fork or even your fingers work as well.  Combine chilled, cubed butter, with the flour, sugar and salt, pulse a few times until butter is the size of small peas.  Add oatmeal and pulse once or twice, just enough to get it mixed through, but not chopped too small.  Crumble mixture over the top of the strawberry rhubarb mixture.  Top with the roasted hazelnuts and bake for 45 minutes until the top is browned nicely and the mixture is bubbling through the cracks.
Serve warm with freshly whipped cream or vanilla ice cream.


Saturday, November 6, 2010

change and a fried apple pie


"No regrets." This is a phrase that goes through my head every time I have a big decision to make.  Weighing the options of the path ahead with the inevitable choices of things left behind.  This is especially difficult with regards to relationships.  Because so much of our lives revolve around those we interact with day after day.  There are those who inspire new ideas and stir passion within us.  Some people “sharpen” us through their personalities, sometimes revealing positive or negative things about us. 

Recently, with the acceptance of a new position in another company, I will no longer have the privilege of working with my fellow comrades whom I have grown to enjoy so much.  In the nature of this workplace, where you hit the ground running, there is seldom time for leisure “talk”.  Conversations are intermittent, like bullets shot out in passing, and since my workplace revolves around cooking, it is usually food related. There is never a day that goes by where ideas of new food combinations or recent culinary attempts good or bad are shared.  Jules, a fellow blogger (and amazing photographer) is always trying something new and to my great enjoyment usually brings in a sample or two to try.

With the onset of fall the fragrance of mulled cider wafts throughout the workplace, and has sparked many a conversation about other possible uses for the mulling spices.  Just the other day, our culinary director Rochelle came up with a spoon in her hand and told me to “open up”.  It was an ice cream base that she had infused with the mulling spices, creating a delicious crème anglaise that perfumed my head with cinnamon, allspice and star anise.  Lovely. 

There are many more folks I will also miss and all have a special place in my heart.  But the one whom I will look back on most and smile is my boss.  Probably the best descriptor of him is from a line in the movie Forrest Gump.  Forrest shares his moms’ idea of what life is likened: a “box of chocolates”.   In that, from day to day “you never know what you’re going to get”.  This has been my boss.  At one moment he’s a hurricane, ranting about and the next breaking out into show tunes (he has a very good singing voice by the way).  Working with him has caused my purchasing of antacid to go up dramatically.  But truth be told, I will miss him terribly.

So as a new chapter is beginning and I have the day off.  I think I will make some fried apple pies and a batch of Rochelle’s Spiced Vanilla Ice Cream to serve on the side.  Reflecting on the experiences and joys I’m leaving, but also looking forward to the adventure ahead. 

“Life is a journey along a bitter-sweet trail.  Sorry you faced the delivery of a difficult message today; we are so excited you are joining our team! Together through hard work, sense of true purpose and fun, we will assure this decision is the best one.”  

(A text I received from my new boss when I told her I officially gave my notice)

No regrets.
Shannon


Bourbon Fried Apple Pies 
inspired by Sam Beall

Fried pies, also called half-moon pies or mule’s ears are a well loved southern favorite.  Traditionally dried fruit, especially dried apples are used for the filling,  but since it is the height of apple season using some unique heirloom varieties found at the farmers' market or even the reliable Granny Smith are a fine option in breaking tradition.
For best results, make the pies ahead of time and freeze them on a tray.  They fry best when frozen.

1 Tbsp. unsalted butter
½ cup (packed) light brown sugar
½ tsp. ground cinnamon
½ tsp. vanilla
¼ cup Bourbon (optional)
4 tart apples, peeled and cut into 1-inch chunks
1 large egg
1 recipe sweet pastry dough (recipe below)
3 cups vegetable oil
Ice cream, for serving (optional)

In a medium skillet over medium heat combine the butter, sugar, and cinnamon.  Boil for about 5 minutes, until very thick and caramelized.  Remove from the heat and carefully stir in the Bourbon; the mixture may sputter.  Return the pan to medium heat and cook, stirring, for another 3 minutes.

Add the apples and swirl the pan or stir gently to coat the apples with the liquid.  Cook for 5 minutes more, or until the apples start to soften.  Remove from the heat and let cool to room temperature; refrigerate if not using within an hour or two.

When you’re ready to assemble the pies, beat the egg and add a couple of tablespoons cold water together until smooth.  Set aside.  Strain the apple mixture through a fine-mesh strainer to remove the solids from the liquid.  Set both aside in separate bowls.

On a floured surface, roll out a quarter of the dough to a thickness of 1/8 inch.  With a 4-inch round cutter, cut out circles and transfer them to a parchment lined surface.  Brush the circles all over with the egg wash.  Spoon a tablespoon of the apple mixture and a little sauce onto the bottom half of each circle.  Fold the top of each down to cover the filling, making half moon shapes.  Using the tines of a fork or your fingers, press down on the edges to seal the pies.  If the dough begins to get to soft, stick it in the refrigerator for a few minutes or so to firm up a bit.

Transfer them to a rimmed baking, still on the parchment, being careful that they don’t touch each other.  Place the baking sheet in the freezer for 4 to 5 hours, until the pies are solidly frozen.  Once frozen, the pies can either be cooked immediately or transferred to resealable plastic bags and kept frozen for a month.

When ready to serve the pies, place the oil in a large skillet and heat of high heat until a pinch of flour sprinkled into the oil immediately bubbles (but doesn’t spit) and begins to brown, or a deep-fry thermometer registers 350°F.  Take the pies out of the freezer and fry a few at a time in the oil, turning them once, for about 5 minutes, until golden brown around the edges and the filling is heat through.

Remove with a slotted spoon and drain on paper towels.  Repeat until all the pies are cooked.  Serve them warm with scoops of ice cream on the side.

makes 16 to 18 pies, enough for 8 to 10 servings 


Sweet Pastry
makes pastry for one 9-inch pie or one 10-inch tart

1 cup all-purpose flour
1 cup cake or pastry flour
½ cup confectioners’ sugar
¼ tsp. salt
8 Tbsp. (1 stick) unsalted butter, at room temperature
2 large eggs
1 large egg yolk

Place the all-purpose flour, cake flour, sugar, and salt in a food processor and pulse to combine.  Add the butter and pulse until the pieces of butter are the size of small peas.  In a small bowl, whisk the eggs and yolk together; pour them over the flour mixture and pulse until the mixture forms large clumps.

Scoop the dough out of the processor onto a floured surface (I am really enjoying using a floured pastry cloth for rolling out dough); knead a few times, just until the dough is smooth.  Form the dough into a disk and wrap in plastic.  Refrigerate for a least 30 minutes, or up to 2 days; the dough can also be frozen for up to 6 months and defrosted overnight in the refrigerator prior to using.


Rochelle's Spiced Vanilla Ice Cream
makes 1 quart

3 cups heavy cream
2/3 cup sugar
1 vanilla bean, seeds scraped out
3 Tbsp. mulling spice mix put into a cheesecloth "purse"

Heat the cream, sugar, vanilla seeds and the mulling spice “purse” in a small saucepan only until the sugar is dissolved.  Be sure not to let the mixture come to a boil.  Once the sugar has dissolved, remove from heat and let set for about 20 minutes to allow the mulling spices to infuse the cream mixture.  Stain into a bowl, cover, and chill very well.  Freeze the mixture in an ice cream freezer according to the manufacturer’s direction.  Spoon into a freezer container and allow to chill in the freezer for a few hours.  Allow to soften before serving.


Friday, October 1, 2010

dig the fig


Whether fresh or dried, figs have long been prized for their promise of sweetness. Of all fruits, figs contain the most sugar, which may explain why they have been honored for centuries as aphrodisiacs and symbols of abundance, understanding, and love. Versatility is a great descriptor of this fruit, whether baked, roasted, stewed, dipped or stuffed this fruit can take many forms and pairs well with sweet or savory dishes.

I’ve been playing around with some different recipes for fig jam and have come up with a deliciously sweet preserve that uses only tender, hand-harvested fruit picked at the peak of ripeness, a touch of citrus, a spicy kick from black peppercorns and then topped off with cognac. The result is an earthy sweet jam with a bright fruit character.

This is a natural to pair with an aged sheep’s milk cheese, spread over a roasted pork loin, poured on top of ice cream or even spooned over ricotta pancakes at breakfast.


No matter which culinary vehicle you choose to serve with this fig jam, it is well worth the effort.

Enjoy!
Shannon


Drunken Fig Jam
makes 3-  ½ pints

2 lb. black mission figs, stemmed, cut into ½ inch pieces
zest and juice of 1 lemon
2 cups sugar
¼ cup Cognac or brandy
½ cup orange juice
1 tsp. black peppercorns placed in cheesecloth “purse”

Zest (yellow part only) and juice the lemon. Combine figs, zest, lemon juice, sugar, Cognac, orange juice and the “purse” of black peppercorns into a heavy large deep saucepan. Bring fig mixture to a boil over medium-high heat, stirring until sugar dissolves. Reduce heat to medium; continue to boil until jam thickens and is reduced by half, stirring frequently and occasionally mashing mixture to crush the larger fig pieces, 30 to 35 minutes. Remove the peppercorn purse and take off the heat.

Ladle mixture into 3 ½ -pint sterilized glass canning jars, leaving ¼ -inch space at the top of the jars. Remove any air bubbles using a chopstick or skewer. Wipe jar threads and rims with a clean damp cloth. Cover with hot lids; apply screw bands. Process jars in a pot of boiling water for 10 minutes. Cool jars completely, store in a cool dark place up to 1 year.


Thursday, May 27, 2010

a perfect paring


I’ve been reminiscing about my childhood. Being raised by two loving Grandparents, I have many fond memories of them and that little pink house that Grandpa had built. It’s interesting that food, even in its simplest form can bring back former days or moments, sometimes good and bad. Lately for me it has been rhubarb and strawberries.

Growing up in Idaho I remember when the spring days would get longer and the temperatures would begin to climb; produce from the garden began to increase. The garden was my Grandfathers pride and joy and probably a place of solace as well. He would bring in armfuls of greens, still warm from the sun with the smell of fresh soil still hugging at the roots. But what really got me excited was when it was time to harvest the rhubarb. It was a very short period during the spring when our few plantings of rhubarb would be ruby red and ready for harvest and the strawberries were heavy, bright red and sweet. This was the time for strawberry and rhubarb pie. And boy, did my Grandma know how to make a pie.

Like most Grandmothers there wasn’t a recipe only intuition and her hands that new the task well. I loved to watch her. We didn’t talk much when she was baking, but she would hum and I would kneel on the kitchen stool sneaking a berry or taking a leftover stalk of rhubarb and dip it into the sugar bowl. Grandma would scoop her coffee cup into the flour tin then into the sugar, giving the mix a turn with her hands. Adding the shortening and butter, (at what ratio I will never know) she would use her fingers to blend the ingredients. Then came the iced water drip by drip until it was the consistency she needed. When it was time to roll the dough the decks would be cleared and a toss of flour went onto the board, then the rolling pin was produced to finish the job. It all seemed so easy, and I relished the entertainment. But probably even more I enjoyed the results. The tender, flaky crust that encased the sweet tart blend of freshly harvested rhubarb and strawberries is a combination that cannot be improved upon.

If the prospect of baking a pie sends you running in the other direction, but you still want to enjoy the perfect paring of rhubarb and strawberry, try this recipe. It is a delightfully simple crisp with a hazelnut oatmeal top that is sure to please. Serve the crisp warm in bowls with freshly whipped cream or vanilla ice cream.

I think even Grandma would have liked it.

Enjoy!
Shannon


Rhubarb & Strawberry Crisp
Serves 8

1 lb. rhubarb, sliced in 1 in. pieces
2 pints strawberries, hulled, sliced in half
Zest and juice from 3 blood oranges (or whatever oranges you have on hand)
¼ cup flour
¼ cup sugar
Topping:
1 stick butter, chilled, cubed
¾ cup all purpose flour
½ cup brown sugar
½ cup oats
Pinch of salt
¼ cup toasted hazelnuts, skins removed, chopped coarsely

Preheat oven to 350°. Grease an 8 x 11 baking dish and set aside. In a bowl combine sliced rhubarb, strawberries, zest and juice from the oranges, flour and sugar. Toss gently to incorporate flour and sugar throughout. Pour into prepared baking dish.

For the topping I like to use a food processor, but a pastry cutter, fork or even your fingers work as well. Combine chilled, cubed butter, with the flour, sugar and salt, pulse a few times until butter is the size of small peas. Add oatmeal and pulse once or twice, just enough to get it mixed through, but not chopped too small. Crumble mixture over the top of the strawberry rhubarb mixture. Top with the roasted hazelnuts and bake for 45 minutes until the top is browned nicely and the mixture is bubbling through the cracks.

Serve warm with freshly whipped cream or vanilla ice cream.

Saturday, May 22, 2010

as sweet as tupelo honey


The fame of Tupelo honey didn’t necessarily happen with Van Morrison’s hit song back in 1971, where the songwriter declares “she’s as sweet as tupelo honey, just like honey from the bee”. Tupelo honey is famed on its own merit.

Tupelo honey is a uniquely delicious, top quality honey and is valued for its inability to granulate. It is one of the most expensive because it is the most expensive to produce. The honey comes from the tupelo gum tree that grows in flooded forest areas in Florida, Louisiana and Georgia. Care must be taken by the beekeepers to clean the combs at the right time so that when the white tupelo gum tree blossoms, only honey from these blossoms is collected. White tupelo honey is a prized sweet delicious light amber honey with a greenish hue. The delightful taste of pure white tupelo honey can be savored on hot buttered toast or for something a little out of the ordinary, incorporate it into a warm crème anglaise that has been infused with dried lavender to make lavender and honey ice cream.

This is a creamy unexpected treat that couldn’t be simpler or more delicious.

Enjoy!
Shannon


Lavender and Honey Ice Cream
makes 3 cups

2 cups heavy cream
1 cup whole milk
1 vanilla bean, split lengthways
½ cup tupelo honey
¼ cup dried lavender
6 egg yolks

Pour the cream and milk into a heavy bottomed pan and place over low heat. Scrape the vanilla seeds from the pod and add them to the creamy milk with the empty pod, along with the honey. Slowly, stirring to incorporate the honey, bring the mixture just below the boil. Remove from heat and stir in the dried lavender. Set aside to infuse for about 15 minutes.

In the meantime, beat the egg yolks with a whisk until the mixture becomes thick and pale yellow. Gently reheat the creamy milk mixture and pour on to the egg yolks, stirring with a whisk as you do so.

Strain through a fine mesh sieve back into the saucepan, removing the lavender. Place over the lowest possible heat. Stir gently and patiently until the custard thickens-this may take 10-15 minutes (don’t be tempted to increase the heat, or you’ll end up with scrambled eggs). It should be thick enough to lightly coat the back of a wooden spoon. Draw a finger along the back of the spoon-it should leave a clear trace.

Pour custard into a covered container and let chill in the refrigerator for at least an hour or overnight.

Tuesday, May 11, 2010

conquering fear with dessert


The culinary blowtorch that I’ve had in my possession for quite a while now has, I must admit been somewhat of a frightening prospect. The thought of using it has seemed like a high risk adventure and yes, dangerous in the hands of a novice (which I am). But recently I stumbled upon a recipe for Caramelized Bananas in Puff Pastry and thought that this was going to be the dessert recipe that would help me conquer the fear of the blowtorch!

I’ve changed up the recipe a bit from the original, actually tossing the bananas in a mixture of butter, brown sugar and rum, making it a little bit more like Bananas Foster. The original recipe has the bananas which are tossed in sugar, then caramelized with the blowtorch. Either way you choose to go with the bananas, if you add some salted caramel and a scoop of vanilla ice cream to top it off you can’t go wrong.

I am happy to report that I successfully made the dessert (wolfed it down, for lunch actually) and didn’t burn the house down or singe my eyebrows. The only ones that received the torch were the butter and rum flavored bananas, and they seemed to love it!

Enjoy!
Shannon


Caramelized Bananas Drizzled Salted Caramel in Puff Pastry
inspired by Gourmet Traveller, Austrailian publication

Puff pastry, 1 sheet
1 egg yolk, for brushing

Caramelized bananas
3 bananas, chopped
1/4 cup (1/2 stick) unsalted butter
1/2 cup (packed) dark brown sugar
1/4 cup dark rum
1 teaspoon fresh lemon juice
Salted Caramel
Vanilla Ice Cream

Preheat oven to 400 cut four 4 inch rounds from pastry and place on a baking tray lined with parchment. Score part-way through pastry to form a 1 inch border, prick the center of the circle with a fork and brush all over with egg yolk. Freeze until firm (5 minutes) then bake until puffed and light golden (6-8 minutes). Remove from oven, detach the center top layers of puff pastry and discard. Return puff pastry to oven and bake until dark golden (6-8 minutes). Set aside.
Meanwhile, prepare caramelized bananas. Melt butter in large nonstick skillet over medium-high heat. Add brown sugar and stir until sugar begins to melt, bubble, and form thick mass, about 4 minutes. Add rum and lemon juice; simmer until mixture thickens slightly, about 3 minutes. Add bananas and cook until glazed with caramel, about 1 minute. Divide the bananas among the puff pastry circles and hit them with a blowtorch until bubbly and the coating hardens, forming a candied coating (if desired). Drizzle with salted caramel and top with vanilla ice cream. Serve hot with extra salted caramel.

serves 4

Sunday, May 9, 2010

a thoughtful take on a simple pleasure


I am so inspired by the literary prose of M.F.K. Fisher the legendary food writer of such books as Consider the Oyster, How to Cook a Wolf,  and The Gastronomical Me. Fishers’ work is masterful; every word seems perfectly placed, like the musical notes in a score. Her muse is food and the enjoyment that surrounds it, and the way in which she shares those pleasures is a melody that seems to transport you to a happier time and place.

It makes me wonder, that in a time that is so busy, where pleasure seems complicated that we can, or are willing to slow down enough to enjoy the simple beauty to be found in life.

With all of the rambling I do in this blog for almost a year now, I’m not sure who even reads these words of mine, if anyone.  I’m curious...dear reader are you a cook, a gourmand, or just a curious passerby? Are you inspired in the kitchen? Or do you simply need inspiration?

When someone finds out I enjoy cooking and even finds out I actually blog about it (which is sometimes a little embarrassing) I more times than not hear “Oh, I don’t cook.” After I hear this I always think, (but of course never say) “Do you eat?”

Or maybe I should ask “Do you eat well?”

My hope is that we will see our need for appreciation of the beauty, especially the simple beauty, to be found in life, amidst the confusion and turmoil that surrounds most of our lives. One simple way to achieve this, in my humble opinion is to carve out time each day to plan and create a meal for your family or just for yourself. Then take pause and a prayer if you will and give thanks.

Below is a recipe for Salted Dark Caramel Sauce, it is a quick delicious pleasure that can be a lovely flavoring for your favorite coffee drink, or simply drizzled over ice cream. I like to take the caramel to the brink of burning, until it is the color of an old penny. I love the deep intense flavor of a well colored caramel.

Enjoy!
Shannon


Salted Dark Caramel

1 cup heavy cream
1/2 vanilla bean, split in 1/2 lengthwise and seeds scraped
1 1/2 cups sugar
1/2 cup water
1 Tbsp. cold unsalted butter
1 Tbsp. sea salt

Place the heavy cream and vanilla bean and seeds in a small saucepan and bring to a simmer over medium heat. Remove the cream from the heat and let sit while making the caramel.

Whisk together the sugar and water in a medium non-reactive saucepan over high heat. Cook until dark golden brown, about 10 to 12 minutes. Remove the caramel from the heat and immediately add the cream slowly, stirring constantly with a wooden spoon. Return to the heat and cook until the mixture becomes smooth. Remove from the heat and stir in the butter and salt. Transfer to a bowl and serve immediately.

makes almost 2 cups

Monday, April 12, 2010

a little fooling around


The "fool" originated in England in the fifteenth or sixteenth century. It is a simple dessert that combines tart fruit with whipped cream. The British traditionally made this dessert with gooseberries, but in spring rhubarb is the perfect choice, with its bright, tart flavor. A very simple dessert to prepare, (dare I say that even a fool can make it), this recipe calls for cooking a compote and then folding in whipped cream.

For me this is just a really good excuse to eat a dish of whipped cream.

Enjoy!
Shannon


Rhubarb Fool
Adapted from Rustic Fruit Desserts: Crumbles, Buckles, Cobblers, Pandowdies, and More by Cory Schreiber and Julie Richardson

1 1/2 pounds rhubarb, trimmed and sliced 1/2 inch thick (about 4 cups or 1 pound prepped)
1/2 cup honey
Zest and juice of 1 orange
2 tablespoons finely chopped candied ginger
1/2 vanilla bean, split
Pinch of fine sea salt
3/4 cup heavy cream
1 tablespoon granulated sugar

To make the fool, put the rhubarb, honey, orange zest and juice, candied ginger, vanilla bean, and salt in a saucepan over medium heat. Stir to combine, then cover and cook, stirring every few minutes, for 10 minutes, until the mixture has come to a boil and the rhubarb has softened. Remove from the heat and allow to cool, then remove the vanilla bean. Transfer the compote to a bowl, and refrigerate, uncovered, for at least 30 minutes, until very cold.

Whip the cream and sugar until soft peaks form, either by hand or using an electric mixer on medium speed. Set aside 1/3 cup of the compote to garnish the dessert, then fold the remaining compote into the whipped cream. Spoon the fool into six 1/2-cup glasses and chill for 1 hour before serving topped with the remaining compote.

Storage: This fool is best served the day it is made, but any leftovers can be covered with plastic wrap and stored in the refrigerator for up to 2 days.


Friday, March 26, 2010

strawberry anticipation and a galette


The strawberries in my garden are just beginning to show signs of life, but the ones at my farmers market are as good as they come; small, sweet, deeply flavored and red right through, none of that ice-white core that so many of them have in the market.

These berries are so tender and juicy that they are hard to beat just piled in a dish, so full that they tumble off the edge and eaten without any embellishment.  This, I have to admit is how I usually enjoy them at this time of year.

I was craving something dessertish, and had some leftover pastry dough so I thought I'd make a simple, yet rustic galette using some of those little beauties. The sweetness of the berries paired with the rich, buttery pastry was a tasty combination and didn’t need much else. But…I thought better of it and made a sweetened mascarpone cream with some vanilla bean to give an additional layer of flavor.

I have to say, it was a good call.

Enjoy!
Shannon


Mascarpone Vanilla Cream
Makes 1 ½ cups

3/4 cup heavy cream
2 tablespoons sugar
3/4 cup mascarpone cheese
1 vanilla bean split lengthways, seeds removed

Using a whisk, blend together all of the ingredients until well combined. Cover with plastic wrap and refrigerate until ready to use.

Strawberry Galette
serves 6 to 8

1 recipe Pastry Dough from the toolbox

1 pound strawberries, hulled
1/4 cup plus 1 tablespoon sugar
2 teaspoons cornstarch
1 large egg yolk
1 tablespoon water
1 tablespoon cold unsalted butter, cut into small pieces


Preheat oven to 350 degrees. On a floured surface, roll dough to 1/4 inch thickness. Cut out a 10-inch round, and transfer to a parchment-lined rimmed baking sheet. Refrigerate for 30 minutes.


Make the galette: Cut strawberries lengthwise into 1/4-inch-thick slices. Toss slices with 1/4 cup sugar and the cornstarch, and immediately arrange them in concentric circles on dough. Start 1 inch from edge, overlapping slices slightly. Fold edge of dough over berries. Refrigerate for 15 minutes.


Whisk together yolk and water. Brush dough with the egg wash, and sprinkle with remaining 1 tablespoon sugar. Dot berries with butter. Bake until crust is golden brown, 40 to 45 minutes.

Transfer to a serving plate. Serve warm with mascarpone vanilla cream


Tuesday, March 23, 2010

rhubarb


“What do you do with this?” Is the typical question that I have been getting recently when purchasing these slender wildly crimson stalks.

The answer: pies, tarts or crumbles, but rhubarb is a great candidate for jam as well. It can be cooked as a compote and served over custard or ice cream, even layered in a trifle would be delicious. Quite often it is paired with other fruits such as strawberries, raspberries or apples to tame down the lively tartness.

I recently stumbled upon a recipe for rhubarb ice cream and just had to make it! I Began by making a simple vanilla custard or crème anglaise and then added the cooked rhubarb the last few minutes of churning. The result was beautiful, a soft pale pink with a subtle tartness that was hard to resist. The black flecks from the vanilla seeds dotted throughout added a lovely underpinning of flavor.  Spooned into chilled bowls and served straight from the churning vessel was the best way to appreciate its wonderful distinctive quality.


A very simple method for cooking rhubarb is to cut it up into even pieces with a sharp knife. Lay in a heavy-based pot and sprinkle with sugar (one-quarter of the weight of rhubarb in sugar). Allow to sit for 5-10 minutes to draw out the moisture, then cook gently and stir until just soft. Depending on your rhubarb you may need a little water or you could substitute orange juice, Verjuice or a sweet wine. A little vanilla bean is a lovely addition, but I think you will really be amazed that the rhubarb flavor alone is all you need.

Enjoy!
Shannon


Rhubarb Ice Cream
inspired by Skye Gyngell

Ice cream base
crème anglaise  (vanilla custard)

2 cups heavy cream
1 cup whole milk
1 vanilla bean, split lengthways
6 egg yolks, preferably organic free-range
½ cup sugar

Rhubarb

4 lbs. rhubarb
1 vanilla bean, split lengthways
½ cup sugar
½ cup to 1 cup Verjuice or water

Start by making the custard base for the ice cream following the method in the toolbox for crème anglaise. Set aside to cool.

Wash and trim the rhubarb, then cut into 1 inch chunks. Lay in a heavy-based pot and sprinkle with sugar. Scrape out the fine black seeds of the vanilla bean and put into the rhubarb mixture along with the bean itself. Allow to sit for 5-10 minutes to draw out the moisture, then add the ½ cup of the Verjuice or water and cook gently and stir until just soft, about 10 minutes or so. Add more Verjuice or water if necessary. The rhubarb should be soft, but not completely falling apart.

Remove rhubarb from heat and allow to cool. The rhubarb can be added to the ice cream base as is, or can be puréed slightly for a more smooth texture.

When ready to churn, pour the custard base into your ice cream maker and churn until thickened (about 20-25 minutes). Just before the ice cream sets, pour in the cool rhubarb and churn for another 10 minutes before serving.

Serves 10


Wednesday, March 10, 2010

toolbox: crème anglaise


Vanilla custard or Crème Anglaise is a staple for many desserts as well as breakfast specialties. It is a light pouring custard that can be used a dessert sauce, poured over cakes or fruits. The custard can be used for French toast or pain perdu and is the base for creamy ice cream or crème brûlée. It has a mild taste but a rich and thick vanilla flavor.

The custard in itself is not difficult to make, but it does require a fair amount of vigilance and care. The cream is made by whipping egg yolks and sugar together until the yolk is almost white and the batter forms pretty ribbons or until your arm gets tired (about 2 minutes), and then slowly adding hot milk, while whisking. The sauce is then cooked over low heat (otherwise the yolks will cook, resulting in scrambled eggs) and stirred constantly with a spoon until it is thick enough to coat the back of a spoon, and then removed from heat. If the sauce reaches to high a temperature, it will curdle. Then you are back to square one.

This sauce is easy to do and should definitely be in anyone's 'toolbox'.

Enjoy!
Shannon


Crème Anglaise (vanilla custard)
makes 3 cups

2 cups heavy cream
1 cup whole milk
1 vanilla bean, split lengthways
6 egg yolks, preferably organic free-range
½ cup sugar

Pour the cream and milk into a heavy bottomed pan and place over low heat. Scrape the vanilla seeds from the pod and add them to the creamy milk with the empty pod. Slowly bring to just below the boil, remove from heat and set aside to infuse for about 15 minutes.

In the meantime, beat the egg yolks and sugar together in a mixing bowl with a whisk until the mixture becomes thicker and paler. Gently reheat the creamy milk and pour on to the egg yolk mixture, stirring with the whisk as you do so.

Return the custard to the saucepan and place over the lowest possible heat. Stir gently and patiently until the custard thickens-this may take 10-15 minutes (don’t be tempted to increase the heat, or you’ll have scrambled eggs). It should be thick enough to lightly coat the back of a wooden spoon. Draw finger along the back of the spoon-it should leave a clear trace.

As soon as the custard thickens, remove from the heat, pour into a bowl and allow to cool. Don’t leave it in the saucepan, as the heat of the pan will continue to cook the custard. Once cooled, the custard is ready to use or can be stored in the refrigerator. Sauce will keep for 4 days.

Thursday, February 18, 2010

a cup of tea


If we drink coffee to get us up and moving, we drink tea to wind us down. So it should come as no surprise that there are health benefits in the consumption of tea. Many scientists agree that tea; both black and green contain important antioxidants and contribute to a healthy lifestyle.

But did you also know that tea like wine can be paired with foods to enhance your baking, cooking, and your dining. And this recipe is proof that tea and cake definitely go together. I came across this recipe in my ever expanding file of “things to make” and decided it was time to get baking.

The recipe, a dense chocolate cake that has an infusion of earl grey tea could be served easily for brunch, afternoon tea, or for dessert.

Produced in Sri Lanka, China and India, Earl Grey is traditionally scented with bergamot oil, which gives it an orange-citrus flavor. And when paired with rich dark chocolate it can’t be beat.

Enjoy!
Shannon


Chocolate-Earl Grey Cake
Adapted  from a recipe in Real Simple Magazine 2007

6 Earl Grey tea bags or 2 Tbsp. loose Earl Grey
1 cup water
½ cup (1 stick) unsalted butter, room temperature
3 eggs
2 cups granulated sugar
4 ounces unsweetened chocolate, melted and cooled
2 cups all-purpose flour
1 tsp. baking soda
1 tsp. baking powder
¼ tsp. kosher salt
½ cup crème fraîche
Confectioners’ sugar, for dusting

Heat oven to 350°F. Coat an 8-cup fluted tube pan with cooking spray. Brew the tea in the water 3 to 5 minutes. Remove the tea bag or strain the leaves and set the brewed tea aside. Sift together flour, baking soda, baking powder and salt together, set aside. Using a mixer, beat the butter, eggs, and granulated sugar until fluffy. Blend in the chocolate. Beat in the flour mixture, crème fraîche and brewed tea. Pour into pan and bake 50 minutes, or up to an hour, until a cake tester comes out with a few crumbs attached. Remove from oven and let cool for 5 minutes, then turn out of pan and cool.  Dust with confectioners’ sugar.

Makes 10 servings

Tuesday, February 16, 2010

double decadence


Knowing my daughter was going to be home from college this past weekend and also knowing that she is pretty over the top regarding anything chocolate, especially dark chocolate. I decided to make a rich dark chocolate ice cream that has, not only one, but two types of dark chocolate.

The lush, luxurious texture of this dense chocolaty ice cream has a hint of Frangelico liquor as well as some roasted hazelnuts that provide a wonderful crunch.

Serve a couple scoops of this chocolate decadence drizzled with extra-melted chocolate and top with a maraschino cherry, if you like.

Enjoy!
Shannon

p.s.
She went back to school today...the ice cream container is empty.


Double Decadence
Serves 10

9 egg yolks
1 cup sugar
Scraped seeds of 1 vanilla bean or 1 tsp. vanilla paste
2 Tbsp. Frangelico
8 ounces good quality dark chocolate, melted
2 Tbsp. Dutch-process cocoa, sieved
2 ½ cup whipping cream
8 ounces crème fraîche or sour cream
1 cup roasted hazelnuts, skins removed, coarsely chopped
Maraschino cherries (optional)

Whisk yolks, sugar, vanilla seeds and Frangelico in a heatproof bowl over a saucepan of simmering water until mixture is tripled in volume, thick and pale and holds a ribbon (4-5 minutes).

Remove bowl from heat and continue whisking until cooled (2-3 minutes). Add chocolate and cocoa and mix to combine.

In another bowl whisk together cream and crème fraîche until blended. Add to the chocolate mixture. Pour into a container, cover and refrigerate at least 2 hours or overnight.

Freeze mixture in an ice cream maker for approximately 20 minutes, it will still be quite soft. Add the chopped hazelnuts right at the end, just until mixed through. Then transfer to an airtight container and put in the freezer to firm up.

Monday, February 1, 2010

a word on "curd"


The word “curd” has never sounded very appealing to me. But when the word “lemon” is in front of it, well that’s another story. It’s then that my jaw tightens and my glands begin to salivate anticipating that something tasty is on the horizon.

Lemon curd, with its silky smooth and tart creaminess is hard to resist. Put into a crepe, or between layers of a decadent yellow cake it has outstanding results. It is wonderful on a warm blueberry scone, a waffle hot off the griddle or my preferred vehicle for enjoying lemon curd… a spoon.


I have been a little compulsive lately with Meyer lemons. They are in season right now and I’ve been like a mad scientist in the kitchen using them in this and that.

The fruit of the Meyer lemon is yellow and rounder than a typical lemon we can find in the markets year round (such as the Eureka or Lisbon). It has a slight orange tint when ripe and is sweeter and less acidic in flavor. The flowers of the Meyer lemon are white with a purple base and are quite fragrant. This is the time of year here in Southern California that the citrus trees are loaded down with fruit and the fragrances of the blossoms are intoxicating.


Even if you cannot find Meyer lemons in your area, you could use the typical Eureka lemon or whatever is available and add some fresh squeezed orange juice at a ratio of 1 part orange juice to 3 parts lemon juice to get a similar taste to the Meyer. Either way, making your own lemon curd is easy and worth the effort. The results are so much better than what you can buy in a jar.

Enjoy!
Shannon

Lemon Curd
Recipe by Karen Solomon from the book jam it, pickle it, cure it

Prep ahead: You will need clean jars to store your bounty. Make sure they are free of rust and odors and the lids seal tightly. Prepare a label that lists the contents and date prepared.

6 eggs plus 1 egg yolk
1 cup sugar
1 ½ cups freshly squeezed lemon juice (from about 12 lemons)
10 tablespoons butter, cut into small pieces
Zest of 2 lemons, removed in large pieces with a vegetable peeler

In a large saucepan, with a whisk, beat the eggs and egg yolk thoroughly, then whisk in the sugar and lemon juice. Stir together until thoroughly combined. The sugar should be completely integrated into the liquids, which will result in a much creamier curd. Place the pot over medium heat and gently warm the mixture. After 3 minutes, add the butter and the zest pieces. Whisk constantly for 7 to 8 minutes, until the butter melts and the mixture becomes very thick.

Pour the curd into a clean glass jar and let it cool at room temperature, uncovered. Remove zest and discard.

Serve warm or refrigerate, in a covered glass jar, up to 10 days.

Makes about 2 cups

Sunday, January 17, 2010

things that go together


When I think of things that go together I think of:

Salt & pepper
Batman & Robin
Chocolate & Vanilla
Fred & Ginger
Dooney & Burke
Bert & Ernie

And of course we cannot leave out the iconic classic American food pairing… Peanut Butter & Jelly!  I would imagine that unless you have some sort of food allergy you probably grew up on this combo stuck between two slices of white bread. Or in my case, wheat bread that was so dry and had so many seeds in it you couldn’t tell if the peanut butter was creamy or crunchy. In any case it is familiar.


I admit I haven’t had a PB & J sandwich in a while, but I do have this combination in bar form. I have had this recipe in my repertoire for several years now from the Barefoot Contessa herself, Ina Garten. It is one of those old stand-by’s that seems to always receive many a praise.

Enjoy!
Shannon


PB & J Bars
Adapted from the Barefoot Contessa

1/2 pound (2 sticks) unsalted butter, at room temperature
1 1/2 cups sugar
1 teaspoon pure vanilla extract
2 extra-large eggs, at room temperature
2 cups (18 ounces) creamy or chunky whatever you have on hand
3 cups all-purpose flour
1 teaspoon baking powder
1 1/2 teaspoons kosher salt
1 1/2 cups (18 ounces) strawberry jam or other jam
2/3 cups salted peanuts, coarsely chopped


Preheat the oven to 350 degrees F.
Grease a 9 by 13 by 2-inch cake pan. Line it with parchment paper, then grease and flour the pan.

In the bowl of an electric mixer fitted with the paddle attachment, cream the butter and sugar on medium speed until light yellow, about 2 minutes. With the mixer on low speed, add the vanilla, eggs, and peanut butter and mix until all ingredients are combined.

In a small bowl, sift together the flour, baking powder, and salt. With the mixer on low speed, slowly add the flour mixture to the peanut butter mixture. Mix just until combined.

Spread 2/3 of the dough into the prepared cake pan and spread over the bottom with a knife or offset spatula. Spread the jam evenly over the dough. Drop small globs of the remaining dough evenly over the jam. Don't worry if all the jam isn't covered; it will spread in the oven. Sprinkle with chopped peanuts and bake for 45 minutes, until golden brown. Cool and cut into squares.


Monday, November 30, 2009

...and this makes 30!


What a month this has been. This post is the conclusion to the challenge from NaBloWriMo, of posting everyday for an entire month, what an accomplishment. As you can tell by my previous posting archive, my average has been about one post per week. Posting every day is a raise of the bar to say the least. My intent at the beginning of the month was to step up to the plate and try to improve my writing, content and photography. I’m not sure if I accomplished that, I have a very long way to go. But it has helped me organize my time better, but sadly not my desk. It is still piled high with files, magazines, cookbooks, etc.

I thought it also might be apropos to take this opportunity to say good-bye to a treasured presence in the food world, Gourmet magazine. After nearly 70 years of fine eating and literary prose, Gourmet magazine is ceasing publication. Conde Nast, the parent company, blamed the tough economic climate as the reason for closing the publication.

For those of us in the food world, the closure is a bit like waking up to find the end of an era. This magazine was unique in its rich content; not only was Gourmet a cooking magazine, it also explored the culture and increasingly the politics of food. The editor-in-chief of Gourmet Ruth Reichl is starting another chapter in her life and I wish her well.

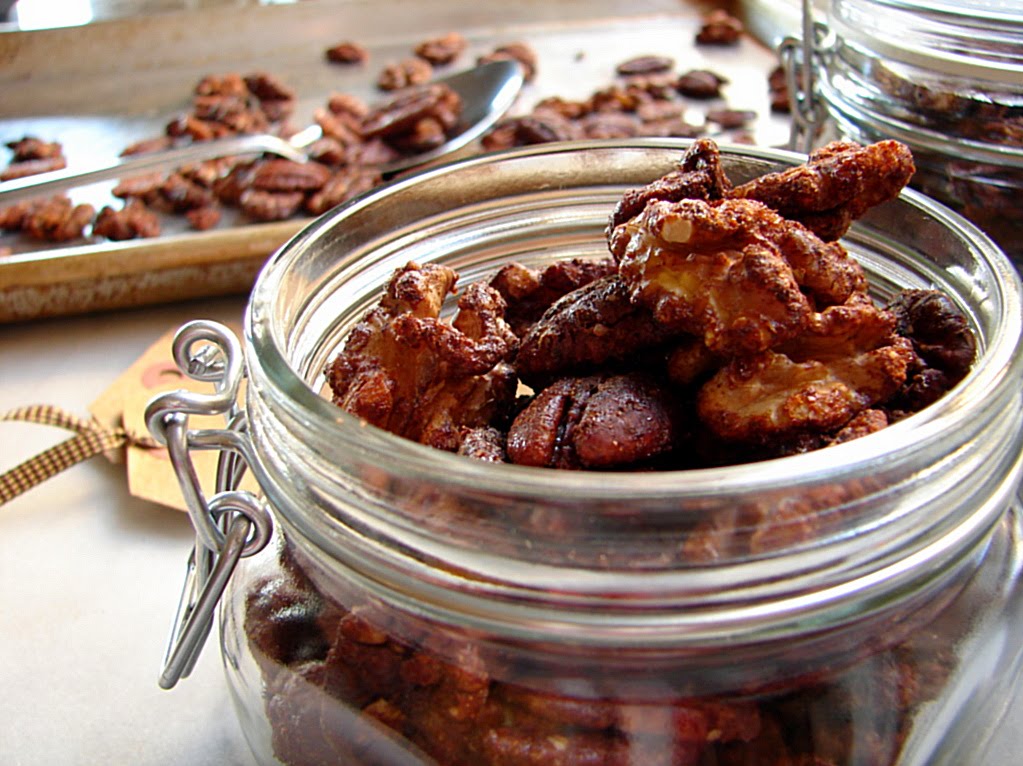
So in tribute to Gourmet, I decided to make a little something from the last issue, spiced nuts.  A handful of these sweet-savory golden pecans and walnuts is just the nibble you need while you prepare for all of those holiday activities…or perhaps as you pull out and thumb through your past issues of Gourmet and get inspired once more.

Enjoy!
Shannon

Sweet and Savory Spiced Nuts
From Gourmet magazine November 2009

3 Tbsp. sugar
1 tsp. paprika
1 tsp. ground cinnamon
½ tsp. ground cumin
Pinch of ground cloves
1 large egg white
2 cups walnut halves (8oz.)
2 cups pecan halves (8oz.)

Preheat oven to 350°F with rack in middle. Lightly oil a 4-sided sheet pan.
Whisk together sugar, spices, and ¾ tsp. salt in a small bowl.
Whisk egg white in medium bowl until frothy, and then stir in nuts. Add spice mixture and toss to coat.

Spread nut mixture in 1 layer in sheet pan. Bake, stirring once or twice, until dry and well toasted, about 20 minutes. Loosen nuts from pan, and then cool completely.

Nuts keep in an airtight container at room temperature 1 week.

Makes 4 cups

Sunday, November 29, 2009

kicked-up gingerbread


When I was going through Jamie Oliver’s cookbook Cook with Jamie, I came across a recipe for what he calls the “Ultimate Gingerbread”. He said that the when he was visiting Grasmere, in England’s Lake District he stopped into a shop that had the best gingerbread he’d ever eaten. He says that they use a secret recipe which is about 150 years old and, of course, they wouldn’t give the recipe to him. So he decided to have a go at it on his own. The result…it is probably some of the best gingerbread you’ll ever eat! The recipe calls for not only ground ginger but also crystallized ginger as well as some candied citrus peel. These additions give this unusual gingerbread a spicy-citrus kick that is tasty as a cookie, but also works pretty fine sprinkled over ice cream or even used as a cheesecake base.

His recipe also calls for golden syrup (an English export called Lyles), which amazingly I did find at a little gourmet shop in town. But if you cannot find golden syrup a mixture of 2 parts light corn syrup to 1 part molasses will do the trick.

So if you want to add a little something different into your baking plans this holiday, give this one a try.

Enjoy!
Shannon

Ultimate gingerbread
Adapted from Jamie Oliver’s cookbook Cook with Jamie

14 oz. store bought shortbread or homemade
6 oz. raw sugar
2 tsp. ground ginger
1/3 cup mixed candied citrus peel, chopped
1/3 cup crystallized ginger, chopped
7 Tbsp. all-purpose flour
A pinch of baking powder
2 Tbsp. golden syrup
2 Tbsp. molasses
5 Tbsp. unsalted butter

Preheat the oven to 325°F and find a baking pan about 8x14 inches. Put the shortbread, sugar, and 2 teaspoons of the ground ginger in a food processor and whiz until you have crumbs. Remove 3 ½ oz. of the mix and keep this to one side. Add the remaining teaspoon of ginger to the processor, along with the mixed peel, crystallized ginger, flour and baking powder, and pulse until well mixed.

Melt the syrup, molasses and butter together in a saucepan big enough to hold all the ingredients. When melted, add the mixture from the food processor and stir with a wooden spoon until everything is thoroughly mixed together. Tip into the baking pan and spread out evenly. Press the mixture down into the tray, using your fingers or something flat and clean like a potato masher or spatula. When the mix is a flat, dense even layer, pop the tray into the preheated oven for 10 minutes.

Take the tray out of the oven and sprinkle the hot gingerbread with the reserved crumbs, pressing them down really well with the potato masher or spatula. Carefully cut into good-sized pieces with a sharp knife, and leave to cool in the pan before eating.

Saturday, November 28, 2009

the dare


The November 2009 Daring Bakers Challenge was chosen and hosted by Lisa Michele of Parsley,Sage,Desserts, and Line Drives. She chose the Italian Pastry, Cannolo (Cannoli is plural), using the cookbooks Lidia’s Italian-American Kitchen by Lidia Matticchio Bastianich and The Sopranos Family Cookbook by Allen Rucker; recipes by Michelle Scicolone, as ingredient/direction guides. She added her own modifications/changes, so the recipe is not 100% verbatim from either book.

This was the first time that I have ever attempted making Cannoli and I must say they were well received by my clan of recipe tasters. I have to admit I completely strayed off the traditional recipe (no surprise there). When I heard about the challenge for this month I was going through a "passion fruit" stage, experimenting with them in different ways. This all to say I decided to go a more "tropical" route instead of the more traditional "Italian" style. So, if you would like to try the traditional cannoli recipe just click the link for theDaring Kitchen  and you will also be able to see some of the wonderful pictures that have been submitted as well. If you would like to try your hand at the "tropical" type try this one...it turned out great!

Enjoy!
Shannon

Coconut & Key Lime Mascarpone “Cannoli” with Passion Fruit Coulis
Loosely adapted from Gourmet May 1995

For “Cannoli” shells:
About twenty 6-inch square parchment paper
¾ cup flaked unsweetened coconut, toasted and cooled
2 Tbsp. all-purpose flour
5 Tbsp. unsalted butter, cut into pieces and softened
½ cup granulated sugar
2 Tbsp. firmly packed light brown sugar
1 Tbsp. milk
1 Tbsp. coconut rum (optional)
Four 3 1/3 to 4 inch long cannoli forms (about 5/8 inch in diameter)

For filling:
4 ounces cream cheese, softened
1/3 cup granulated sugar
2 tsp. freshly grated lime zest
4 Tbsp. freshly squeezed Key Lime juice
1 cup mascarpone cheese

Passion Fruit Coulis:
8-10 passion fruit (an option if you can't find passion fruit would be mangos)

Accompaniments: fresh raspberries

To Make “Cannoli” shells:
Preheat oven to 350°F and lightly grease a heavy baking sheet.

Arrange 4 parchment squares on the greased baking sheet.

In a food processor blend together coconut and flour until coconut is ground fine. Add butter, sugars, rum and milk and blend until dough forms a ball, about 10 seconds. Spoon a well-rounded teaspoon of dough onto each of the 4 parchment squares and with slightly wet fingertips evenly pat into 2-inch rounds.

Bake cookies in middle of oven until very thin and golden brown, about 10 minutes. Immediately transfer cookies (still on parchment) to rack and let stand until just firm enough to hold their shape, 30-45 seconds. Working with 1 cookie at a time and using parchment as an aid, quickly roll cookie around a cannoli form to make a cylinder. (If cookies become too firm to roll, return them to parchment on baking sheet to oven 1 minute to soften.) Cool formed cookies on a rack before removing cannoli form. Make more cookies in same manner with remaining dough, baking and forming cookies in batches of 4 and allowing baking sheet to cool completely between each batch. Cookies are fragile. Cookies keep in one layer in an airtight container at room temperature 4 days.

Make filling:

In a bowl with an electric mixer beat cream cheese with sugar, zest and lime juice until smooth and beat in mascarpone. Chill filling, covered, until firm, at least 4 hours and up to 1 day.

Make Passion Fruit Coulis:

Cut Passion Fruit in half and scoop out seeds and pulp. Put into a food processor and pulse just until seeds begin to crack. Strain mixture through a fine sieve and refrigerate until ready to serve with “cannoli”.

Assemble dessert:

Whisk filling and transfer it to a pastry bag fitted with a ¼-inch plain or decorative tip. Carefully pipe filling into both ends of 12 cookies. Pour about ¼ cup Passion Fruit Coulis onto each of 6 dessert plates to distribute evenly, and top with 2 “cannoli” and raspberries.

Tuesday, November 24, 2009

a good excuse


I don’t know If I ever mentioned it, but my husband and I are empty-nesters (except for the dog, but I’m not sure that counts). Both kids are away at college, one is in Chicago the other up the coast a few hours in Santa Barbara. So when the holiday’s come around I stock up on more food than usual and get in the mood to make things I wouldn’t normally make for just myself and the hubby.

Usually breakfast for me is a latte with an extra shot to get me going…sometimes I might grab a banana before I head out the door, but it always seems like they have just gone past their peel and eat stage to the “oh dear, I guess I better make banana bread stage”.

So with the Thanksgiving break in full swing, what better way to treat these worn out college kids than to make homemade doughnuts for breakfast…sinful I know, but so delicious!

These doughnuts are a fantastic breakfast, naughty snack or tasty dessert. The important thing is that they must be served warm and tossed in the spicy-citrus sugar. These little babies are great to dip into a fruit compote or even a chocolate sauce .

Enjoy!
Shannon


Doughnuts with Spicy-Citrus Sugar
A slightly adapted Jamie Oliver recipe

This recipe is from Jamie Oliver, I’ve modified the process in that I use my stand mixer…it was so much easier than the whole kneading thing.

1 ¼ ounce package active dried yeast
1/3 cup superfine sugar
3 ½ cups all-purpose flour
1 ½ cups plus 2 Tbsp. whole milk, warmed until tepid
Zest of 2 lemons
Zest of 1 orange
5 ½ Tbsp. unsalted butter, softened and cubed
1 ¾ pints vegetable oil

For the spicy-citrus sugar
½ cup superfine sugar
1 tsp. ground cinnamon
½ tsp. freshly grated nutmeg
½ tsp. ground allspice
Zest of 1 lemon
Zest of 1 orange
1 vanilla bean, scored lengthways and seeds removed

Put the yeast in the bowl of a stand mixer with a tablespoon of the sugar and a tablespoon of the flour and mix in the warm milk. Put in a warm place for about 15 minutes until the mixture becomes frothy.

Next, put the rest of the sugar and flour, lemon zest, orange zest and butter into the bowl with the yeast mixture. Turn mixer on low to start bringing it together, then slowly speed it up, finally ending on a medium-high setting. Let the machine run until the dough begins to “slap” the sides of the mixing bowl and the dough looks smooth and silky. Then put dough into another bowl that has been lightly greased and cover with a clean damp kitchen towel and leave to rise for about an hour, or until it has doubled in size. When the dough has doubled in size, you can knock it back-this means you give it a bit of a punch to knock out some of the air so it can rise again later. This way your donuts will be light and fluffy. I actually did all this the day before, and then put the dough covered tightly into the refrigerator.

On a floured surface roll the dough out until it’s an even ½ inch thickness. Using a little cutter or small glass (approx. 2 inches in diameter) cut out about 25 little circles and pop them on to a greased baking pan to rise again, making sure there is sufficient gap between each one to allow them to spread. Cover with a damp tea towel and allow to rise for 45 minutes.

While you’re waiting for the doughnuts to rise, you can make the flavored sugar. Take all of the flavored sugar ingredients and mix thoroughly together; I used a mortar and pestle to break up the zest and vanilla seeds so that it would incorporate into the sugar. Put aside until after frying the doughnuts.


When the blobs of dough have almost doubled in size again, use a chopstick to make a little hole in the center of each doughnut. Now they are ready to be fried. Carefully heat the vegetable oil in a large deep saucepan. You can test the temperature by putting a leftover pea-sized piece of dough into the oil-if it sizzles and turns a golden brown after about a minute you oil is at the right temperature. Fry your doughnuts in batches. After about 2 minutes, when they are golden brown, carefully remove them with a slotted spoon, and place them on some paper towels to drain. While your doughnuts are still piping hot, sprinkle with the flavored sugar.


These are lovely eaten warm-feel free to pig out and eat them all in one go because they don’t keep very long.