Showing posts with label in-between. Show all posts

Saturday, January 1, 2011

resolved


“It is said that without the culinary arts the crudeness of reality would be unbearable.”

This is such a classic line from the movie Kate & Leopold, where Hugh Jackman portrays a gentleman from the 19th century, who unexpectedly finds himself in 21st century New York.  He begins the discourse by sharing that where he comes from, “the meal is the result of reflection and study.  Menus are prepared in advance.  Timed to perfection.”
 
It all sounds lovely.  But is it possible to truly live this way with our hectic schedules, where  our alarms are set each day so that we can hit the ground running, trying to complete the “list” that never seems to end. I believe we can, it just takes planning.  Food is a powerful vehicle that can transport us in some small way to a time and place to an atmosphere of life that seems fleeting at times.

Now that 2010 has been shown the door and 2011 is ushered in we all have a fresh start.  Looking ahead, forgetting what is behind…setting that invisible bar to the next level. 

This year I hope to take steps toward this idea in different areas of my life, to make the most of every opportunity in relationships, at work, at home, even in the kitchen. 

This dish of Oysters with Champagne Granita is (in my opinion) the epitome of good food and the good life.  The delicious simplicity of a freshly shucked oyster cannot be rivaled.


I love the briny, cold, creamy texture of oysters, but when topped with a frozen granita made from champagne it is taken to a whole different level.


So with the Don Perignon chilled and the oysters at the ready, I raise my glass to you and to the new year.

For last year’s words belong to last year’s language.  And next year’s words await another voice.  And to make an end is to make a beginning.~ T.S. Eliot

Cheers.
Shannon


Oysters with Champagne Granita
Inspired by Anne Burrell

2 cups Champagne or Prosecco
1/2 cup Champagne vinegar
1 shallot, finely chopped
1 tablespoon salt
1 tablespoon sugar
2 cups rock salt for plating (optional)
12 oysters, freshest and your favorite variety or a mix- whatever you like

Combine all of the ingredients, except the oysters, in a small saucepan and bring to a simmer over medium heat. Stir until all of the sugar and salt have dissolved.
Pour the mixture into a wide flat dish and put it in the freezer. As the mixture begins freeze, drag a fork through it to break up the ice crystals. Repeat this process every 15 minutes or so until the mixture is completely frozen. When done it will look like ice shards, kind of slushy but a bit more frozen.
Scrub the outside of the oysters to remove any sand and grit. If using, spread the rock salt out on a serving dish. Shuck the oysters and lay them on the rock salt. Top each oyster with the granita and serve immediately.



Suggested reading:  Consider the Oyster by M.F.K. Fisher


Thursday, August 19, 2010

kicking back and some farmer's cheese with stone fruit


Waking up this morning with the knowledge that I had a day off I felt almost giddy and I began to make my list…

It begins with the morning ritual of a walk with my hubby and the dog and then off for coffee at a favorite local hangout.

After the legal addictive stimulant had done its handiwork, it was time to get serious. Should I finally crack open one of the many books that I’ve been meaning to get to or should I hit the beach? Or what about heading out to some of my favorite antique shops to find a lovely treasure that needs a new home? Gardening? Trying out that new recipe?

But after some thought I decided to text a good friend to see if she was up for lunch…thankfully for me she was.

Enjoying the relaxing outdoor atmosphere of my favorite local restaurant Ramos House, it was sheer bliss knowing that the most difficult thing ahead of me was deciding what to order from the menu.

I decided to start with the stone fruit with farmer’s cheese, a mix of peaches, plums and nectarines. It was the perfect start.  Especially since stone fruits are at the peak of the season right now, and with the addition of some fresh mint and blueberries it couldn’t have been a better precursor to my savory main course.


But the thing that took it over the top for me was the farmer’s cheese. The delicate creaminess and slight tang were the perfect accompaniment for the fruit. This cheese has a very creamy mouth feel and can be used in many different applications that call for ricotta and it works beautifully in lasagna as well. It is a little difficult to find, although I’ve seen it in some specialty food stores, but it couldn’t be easier to make yourself.

The process starts by basically taking 1 gallon of whole milk and bringing it up just to the boiling point (190°) over medium heat. Stir occasionally to prevent the milk from scorching on the bottom of the pot.

When the milk begins to reach the 190° point, small bubbles will begin to appear at the edges, turn off the heat. Stir in about ¼ cup lemon juice into the milk and a pinch of salt, and the milk will curdle. You may need to wait 10 to 15 minutes for the curds to fully form.

 
Line a sieve or colander with 4 layers of cheesecloth, and pour the milk through the cloth to catch the curds. This may take a few hours, what is left in the cheesecloth is the Farmer's Cheese. The liquid is the whey. Some people keep the whey and drink it, but I throw it away. Gather the cloth around the cheese, and squeeze out as much of the whey as you can. Wrap in plastic, or place in an airtight container. Store in the refrigerator. This yields about 1 pound of cheese.


Enjoy!
Shannon


Saturday, August 14, 2010

in the eye of the beholder


I think we’ve been trained to think that anything ugly can’t be good. This is especially wrong when looking at figs. They have to be gushy, ugly and soft before they’re good.

Most figs we find in the grocery stores are picked too early; they need to ripen on the tree because they won’t ripen off of it. But growers who sell through farmers’ markets can pick their figs dead-ripe and count on finding customers who don’t care that the fruit’s not picture-perfect.

The harvesting of figs is not an easy task, and probably the main reason why they are a little pricey. Figs are brutal on workers’ hands because the stems “bleed” latex when it’s cut. The latex so irritates the cuticles and the area under the nails that the pickers have to tape their fingers like football players do. At night, workers soak their hands with medicinal herbs. Usually growers will maintain two crews so no one picks too many days in a row.

Look for figs that are very soft. Black Missions, the typical ones we find here in California are tear drop shaped with a thin purplish-black skin and a slightly reddish flesh, these taste best when they start to shrivel. The small round Kadota fig has a greenish yellow skin with a honey sweet flesh. When ripe they should have a drop of “honey” at the end. Avoid figs with any sign of mold.

Don’t store figs in plastic; they don’t like humidity. Refrigerate them in a paper bag, or better yet on a plate. They should keep a week.

Even though figs are delicious on their own, I have a favorite way to enjoy them for a simple appetizer or in-between meal nibble. Simply halve the figs and put a small knob of goat cheese on top of each one.


Drizzle with a touch of Balsamic Vinegar or Vincotto, then wrap in a thin layer of prosciutto. The tender sweetness of the fig with the tang and creaminess of the goat cheese pairs beautifully with the salty prosciutto.

Remember the season for these little beauties is short so enjoy them while you can!

Enjoy!
Shannon


Saturday, July 24, 2010

commander in cheese


Roquefort is renowned throughout the world as the “King of Cheeses”. It was named after a village in the south of France and is infamous for its pungent smell and characteristic blue veins of mold.

The story behind the origins of Roquefort blue cheese has been romanticized in an old legend. It begins with a young shepherd who was minding his flock of sheep in the hills of Roquefort when he suddenly sighted a beautiful maiden in the distance. Determined to find her he left his dog to guard the sheep and hastily placed his lunch-bread and ewe’s milk curds in the nearby caves to keep cool. The shepherd was away for days, looking for his maiden. Unfortunately, he never found her. The shepherd, dejected, returned to his sheep tired and hungry. When he took his lunch out of the caves, he found that the bread and milk curds were moldy. His hesitation was brief due to his hunger. With some trepidation, the shepherd took a bite and was pleasantly surprised to find that his moldy lunch tasted so good! Roquefort was born.

Whether this story is true or not, the fact remains that Roquefort is delicious. True, it is an acquired taste, and many are thrown off by its strong smell. But this is a pity, because Roquefort’s moist and creamy texture is a delectable experience not to be missed.

If you are on the fence about this cheese, why not give this recipe a try. It is the classic paring of a sweet tender pear with the salty pungent cheese. Put together in a pastry shell and filled with a simple mixture of cream and eggs. This lovely tart is a perfect lunch dish or served for a light dinner.

Enjoy!
Shannon


Pear and Roquefort Tart
Serves 6

1 recipe for pastry
6 oz. Roquefort
1 ripe pear, peeled, cored, and sliced into small dice
2 eggs
1 cup cream
1 tsp. freshly grated nutmeg
Salt
Freshly ground pepper


After preparing your pastry dough following the link above, place one round of the uncooked pastry dough into a 10” tart shell with removable bottom.


Scatter prepared pear onto the pasty shell evenly. Then using your fingers break off small chunks of the Roquefort cheese and place in between the pear pieces.


In a small bowl beat the eggs lightly, add the cream, nutmeg and salt and pepper. Mix together well. Pour mixture over the pears and cheese. Bake in a 425° preheated oven until set. About 20 minutes. Serve warm or at room temperature.


Saturday, May 1, 2010

a bit peckish and a vacancy


There are some days when I just don’t feel like cooking. I would rather be lollygagging around in the garden keeping up on what is blooming or in need of a little pruning. On one of those days I stumbled upon a hummingbird nest that had been vacated, and now the branch that supports that little work of love is proudly displayed in a glass of water by my kitchen window.

I was getting hungry after my foray in the garden and just not in a mood to make some big production in the kitchen.

While rummaging around in the pantry looking for something to satisfy I came upon some Carr’s wheat crackers. I also had a few dates hiding behind the pickle jar in the fridge and just enough French Brie in the cheese drawer to justifiably smear on a handful of the crackers.

It may sound like a quirky combination, but rest assured it was delicious. Brie when properly ripened and brought to room temperature is soft and creamy. The flavor is rich, and savory with a slightly salty note. Dates, with their extraordinary sweetness and chewy texture, when paired with the Brie make for a toothsome snack.

So even though the little nest I stumbled upon in my garden had been empty and deserted, my hunger is now satisfied by that tasty tidbit.


Now…what to make for dinner.

Enjoy!
Shannon

Thursday, April 29, 2010

a little lunch and a word on labne


I love the back-palate fieriness that radishes give. Pair that with some hard-cooked farm-fresh eggs, a bit of flaky sea salt and a simple toasted crostini smeared with some homemade Labne and you have a perfect breakfast, lunch or mid-day snack.


Labne is a cheese made from drained Greek style yogurt. It is a Middle Eastern favorite and very easy to make at home. It is delicious used as a spread and can be used as a substitute instead of butter.

When raw materials are this alluring, it just makes me smile.

Enjoy!
Shannon


Line a fine sieve with 2 layers of damp muslin, allowing the muslin to overhang. Combine thick natural yogurt, such as Greek-style yogurt, and a little salt in a bowl (this helps draw out the whey). Spoon into the muslin. Draw up the corners of the muslin to cover the yogurt mixture and knot securely. Thread a wooden spoon through the knot and place over a bowl to drain in the fridge for 2-3 days or until the yogurt is very thick. Labne can be stored in the refrigerator for up to one week.


Sunday, March 28, 2010

a guilty pleasure


In as much as I consider myself a pretty serious foodie, I have to admit that when my hubby offers to take me out for dinner what inevitably sounds the best is a killer blue cheese burger with some seriously skinny fries (not skinny in the low-fat sense just to clarify). And while that combo is hard to beat, for me it’s all about the fries. Yes the fries. I have made it a personal mission to locate the best places for these slim, salty jumbles of crunchy finger lickin’ good potatoes in Orange County.

On a recent outing to a favorite local dining spot, the hubby and I were working our way through a plate of these little lovelies. He looks over at me and says “I bet you could make these.”

Hmmm.

So after a little experimenting, I think I came up with a pretty darn good recipe. So good in fact, that after making up a batch, we ate almost the whole pile before the rest of dinner was plated. The trick for these is in the double frying. Fry the potatoes once to sort of get them going, take them out to drain. Raise the temperature and fry again. This insures that they come out perfectly crisp and cooked all the way through. Although a sprinkling of salt and pepper is perfectly fine for serving, I decided to make a Meyer Lemon Gremolata to serve on top. The fresh parsley, garlic and lemon zest mixed with the warm fries looks, smells and tastes great.

They were wicked good!

Enjoy!
Shannon

Wicked Good Fries with Meyer Lemon Gremolata
should serve 4 if your lucky

4 Russet Idaho Potatoes
Peanut oil for frying
salt & pepper

Meyer Lemon Gremolata

3 Tbsp. chopped parsley
3 Meyer lemons, zested
2 garlic cloves, finely chopped

To make the Gremolata, mix together the chopped parsley, grated Meyer Lemon zest and the finely chopped garlic cloves. Set aside until ready to serve.

Attach a candy thermometer to the side of large heavy deep pot (do not let tip touch bottom). Add enough peanut oil to pot to reach depth of 3 inches. Heat oil over medium heat to 300°F.

While the oil is coming up to temperature, peel the potatoes and cut lengthwise into 1/4-inch-thick slices, then cut lengthwise into 1/4-inch-wide strips. Toss into a large bowl with very cold water until ready to fry. When oil is up to temperature, take the potato strips out of the water and place on 2 large baking sheets lined with paper towels, pat dry with additional paper towels.

Working in batches, add potatoes to oil and cook until potatoes are just tender, stirring occasionally and maintaining heat at 300°F, about 3 minutes per batch. Transfer potatoes to 1 prepared baking sheet to drain. Heat same oil until temperature reaches 360°F to 365°F. Working in batches, add same fries to oil and cook until golden brown, maintaining temperature between 360°F and 365°F, about 2 minutes per batch. Transfer to second prepared baking sheet to drain. Transfer french fries to serving dish; sprinkle with salt and pepper and then top off with the Gremolata.


Monday, November 30, 2009

...and this makes 30!


What a month this has been. This post is the conclusion to the challenge from NaBloWriMo, of posting everyday for an entire month, what an accomplishment. As you can tell by my previous posting archive, my average has been about one post per week. Posting every day is a raise of the bar to say the least. My intent at the beginning of the month was to step up to the plate and try to improve my writing, content and photography. I’m not sure if I accomplished that, I have a very long way to go. But it has helped me organize my time better, but sadly not my desk. It is still piled high with files, magazines, cookbooks, etc.

I thought it also might be apropos to take this opportunity to say good-bye to a treasured presence in the food world, Gourmet magazine. After nearly 70 years of fine eating and literary prose, Gourmet magazine is ceasing publication. Conde Nast, the parent company, blamed the tough economic climate as the reason for closing the publication.

For those of us in the food world, the closure is a bit like waking up to find the end of an era. This magazine was unique in its rich content; not only was Gourmet a cooking magazine, it also explored the culture and increasingly the politics of food. The editor-in-chief of Gourmet Ruth Reichl is starting another chapter in her life and I wish her well.

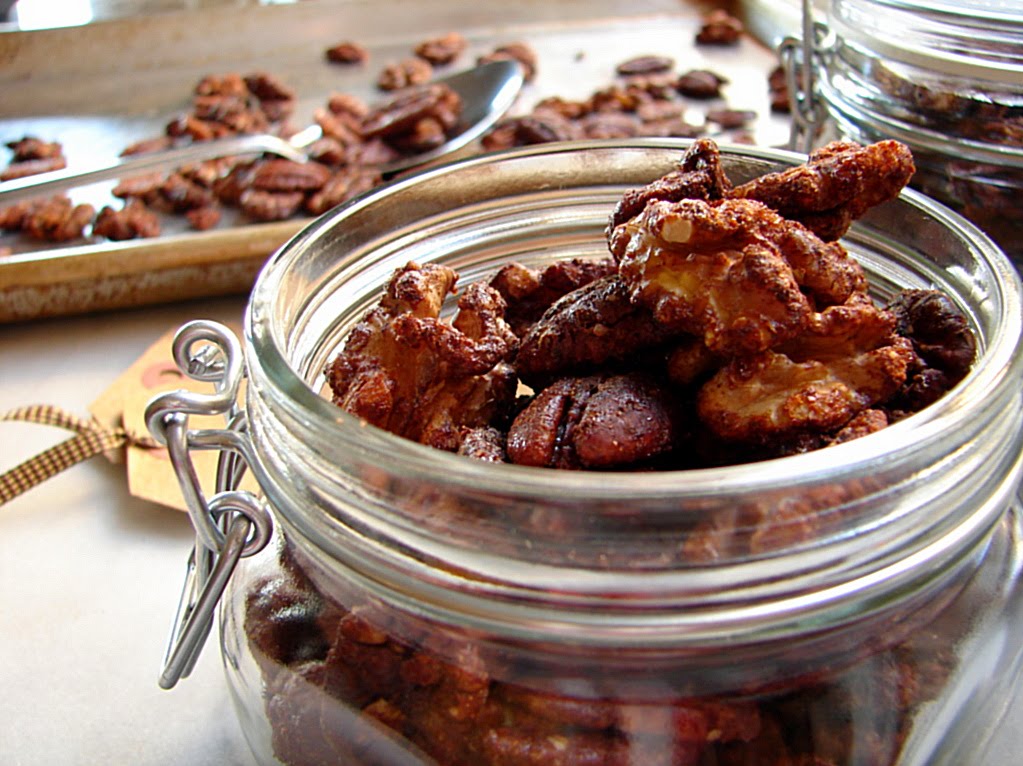
So in tribute to Gourmet, I decided to make a little something from the last issue, spiced nuts.  A handful of these sweet-savory golden pecans and walnuts is just the nibble you need while you prepare for all of those holiday activities…or perhaps as you pull out and thumb through your past issues of Gourmet and get inspired once more.

Enjoy!
Shannon

Sweet and Savory Spiced Nuts
From Gourmet magazine November 2009

3 Tbsp. sugar
1 tsp. paprika
1 tsp. ground cinnamon
½ tsp. ground cumin
Pinch of ground cloves
1 large egg white
2 cups walnut halves (8oz.)
2 cups pecan halves (8oz.)

Preheat oven to 350°F with rack in middle. Lightly oil a 4-sided sheet pan.
Whisk together sugar, spices, and ¾ tsp. salt in a small bowl.
Whisk egg white in medium bowl until frothy, and then stir in nuts. Add spice mixture and toss to coat.

Spread nut mixture in 1 layer in sheet pan. Bake, stirring once or twice, until dry and well toasted, about 20 minutes. Loosen nuts from pan, and then cool completely.

Nuts keep in an airtight container at room temperature 1 week.

Makes 4 cups

Tuesday, November 24, 2009

a good excuse


I don’t know If I ever mentioned it, but my husband and I are empty-nesters (except for the dog, but I’m not sure that counts). Both kids are away at college, one is in Chicago the other up the coast a few hours in Santa Barbara. So when the holiday’s come around I stock up on more food than usual and get in the mood to make things I wouldn’t normally make for just myself and the hubby.

Usually breakfast for me is a latte with an extra shot to get me going…sometimes I might grab a banana before I head out the door, but it always seems like they have just gone past their peel and eat stage to the “oh dear, I guess I better make banana bread stage”.

So with the Thanksgiving break in full swing, what better way to treat these worn out college kids than to make homemade doughnuts for breakfast…sinful I know, but so delicious!

These doughnuts are a fantastic breakfast, naughty snack or tasty dessert. The important thing is that they must be served warm and tossed in the spicy-citrus sugar. These little babies are great to dip into a fruit compote or even a chocolate sauce .

Enjoy!
Shannon


Doughnuts with Spicy-Citrus Sugar
A slightly adapted Jamie Oliver recipe

This recipe is from Jamie Oliver, I’ve modified the process in that I use my stand mixer…it was so much easier than the whole kneading thing.

1 ¼ ounce package active dried yeast
1/3 cup superfine sugar
3 ½ cups all-purpose flour
1 ½ cups plus 2 Tbsp. whole milk, warmed until tepid
Zest of 2 lemons
Zest of 1 orange
5 ½ Tbsp. unsalted butter, softened and cubed
1 ¾ pints vegetable oil

For the spicy-citrus sugar
½ cup superfine sugar
1 tsp. ground cinnamon
½ tsp. freshly grated nutmeg
½ tsp. ground allspice
Zest of 1 lemon
Zest of 1 orange
1 vanilla bean, scored lengthways and seeds removed

Put the yeast in the bowl of a stand mixer with a tablespoon of the sugar and a tablespoon of the flour and mix in the warm milk. Put in a warm place for about 15 minutes until the mixture becomes frothy.

Next, put the rest of the sugar and flour, lemon zest, orange zest and butter into the bowl with the yeast mixture. Turn mixer on low to start bringing it together, then slowly speed it up, finally ending on a medium-high setting. Let the machine run until the dough begins to “slap” the sides of the mixing bowl and the dough looks smooth and silky. Then put dough into another bowl that has been lightly greased and cover with a clean damp kitchen towel and leave to rise for about an hour, or until it has doubled in size. When the dough has doubled in size, you can knock it back-this means you give it a bit of a punch to knock out some of the air so it can rise again later. This way your donuts will be light and fluffy. I actually did all this the day before, and then put the dough covered tightly into the refrigerator.

On a floured surface roll the dough out until it’s an even ½ inch thickness. Using a little cutter or small glass (approx. 2 inches in diameter) cut out about 25 little circles and pop them on to a greased baking pan to rise again, making sure there is sufficient gap between each one to allow them to spread. Cover with a damp tea towel and allow to rise for 45 minutes.

While you’re waiting for the doughnuts to rise, you can make the flavored sugar. Take all of the flavored sugar ingredients and mix thoroughly together; I used a mortar and pestle to break up the zest and vanilla seeds so that it would incorporate into the sugar. Put aside until after frying the doughnuts.


When the blobs of dough have almost doubled in size again, use a chopstick to make a little hole in the center of each doughnut. Now they are ready to be fried. Carefully heat the vegetable oil in a large deep saucepan. You can test the temperature by putting a leftover pea-sized piece of dough into the oil-if it sizzles and turns a golden brown after about a minute you oil is at the right temperature. Fry your doughnuts in batches. After about 2 minutes, when they are golden brown, carefully remove them with a slotted spoon, and place them on some paper towels to drain. While your doughnuts are still piping hot, sprinkle with the flavored sugar.


These are lovely eaten warm-feel free to pig out and eat them all in one go because they don’t keep very long.


Monday, November 16, 2009

at long last


This quince saga has come to a close. Thank goodness. The lesson learned: patience. You cannot rush the cooking of a quince, waiting for it to turn that lovely blood orange red color. I must tell you that out of the four different recipes I found they all said the final cooking time of the puréed mixture would take 1 hour. Well, mine took a little over 3 hours. Yes, it was a labor of love. I didn’t have to hover over the stove, but I didn’t go very far…checking email…load of laundry…etc.

So my ruby red squares of deliciousness have been packaged up neatly in parchment paper ready to be shared. The simplicity of this sweet treat paired with the traditional Manchego cheese is a wonderful beginning to a meal or even as a dessert course.

So for those of you that might be in possession of some quince or that are interested in giving this a whirl, here is the recipe I ended up using.

Enjoy!
Shannon


Quince Paste
From Simply Recipes

4 pounds quince, washed, peeled, cored, roughly chopped
1 vanilla pod, split
2 strips (1/2 inch by 2 inches each) of lemon peel (only the yellow peel, no white pith)
3 Tbsp lemon juice
About 4 cups of granulated sugar, exact amount will be determined during cooking

1 Place quince pieces in a large saucepan (6-8 quarts) and cover with water. Add the vanilla pod and lemon peel and bring to a boil. Reduce to a simmer, cover, and let cook until the quince pieces are fork tender (30-40 minutes).

2 Strain the water from the quince pieces. Discard the vanilla pod but keep the lemon peel with the quince. Purée the quince pieces in a food processor, blender, or by using a food mill. Measure the quince purée. Whatever amount of quince purée you have, that's how much sugar you will need. So if you have 4 cups of purée, you'll need 4 cups of sugar. Return the quince purée to the large pan. Heat to medium-low. Add the sugar. Stir with a wooden spoon until the sugar has completely dissolved. Add the lemon juice.

3 Continue to cook over a low heat, stirring occasionally, for 1-1 1/2 hours (or up to 3 in my case), until the quince paste is very thick and has a deep orange pink color.

4 Preheat oven to a low 125°F (52°C). Line an 8x8 baking pan with parchment paper (do not use wax paper, it will melt!). Grease the parchment paper with a thin coating of butter. Pour the cooked quince paste into the parchment paper-lined baking pan. Smooth out the top of the paste so it is even. Place in the oven for about an hour to help it dry. Remove from oven and let cool.

To serve, cut into squares or wedges and present with Manchego cheese. To eat, take a small slice of the membrillo and spread it on top of a slice of the cheese. Store by wrapping in parchment paper, foil or plastic wrap, and keeping in the refrigerator.

Tuesday, November 10, 2009

special delivery


As I mentioned in my post yesterday, my hubby and I took a day trip up the coast to see my daughter at college. One reason for the visit was to bring some encouragement. The other reason, at my daughter’s specific request, was to bring chocolate, in the form of these outrageously dense, gooey, sinfully delicious brownies.
Now the actual label for these illustrious brownies by Rick Katz is “Best-Ever Brownies”. Now this might sound a little prideful. There are many tasty brownie recipes out there, but I must say, these are pretty darn awesome. For me, it is all about the chocolate. In this recipe, the brand of chocolate is not specified…but my chocolate of choice in baking is Valrona.
Now those who are passionate about brownies argue in defense of their favorite type, cakey or fudgey. If you’re a cakey fan, go on to another recipe. These are the epitome of soft, dark, baked-just-until-barely-set brownies. Their creamy texture makes them seem wildly luxurious and very much a treat to be meted out in small servings.
The mixing method is a bit unorthodox for a brownie. Half of an egg-sugar mixture is stirred into the melted chocolate and butter, while the other half is whipped until it thickens and doubles in volume. The lightened eggs are folded into the chocolate with a delicate touch, as are the dry ingredients…tricks that enhance the brownies’ lovely texture.

Enjoy!
Shannon


Best-Ever Brownies
by Rick Katz

1 ¼ cups sifted all-purpose flour
1 tsp. salt
2 sticks (8 ounces) unsalted butter
4 ounces unsweetened chocolate, coarsely chopped
2 ounces bittersweet chocolate, coarsely chopped
2 cups sugar
1 tsp. pure vanilla extract
4 large eggs

Center a rack in the oven and preheat the oven to 350°.
Sift the flour and salt together and set aside.
Melt the butter and chocolate together in the top of a double boiler over, not touching, simmering water. Add 1 cup of the sugar to the mixture and stir for half a minute, then remove the pan from the heat and stir in the vanilla. Pour the mixture into a large bowl.
Put the remaining 1 cup sugar and the eggs into the bowl of a mixer with the whisk attachment and beat until just combined. Little by little, pour half of the sugar and eggs into the chocolate mixture, stirring gently but constantly with a rubber spatula so that the eggs don’t set from the heat.
Whip the remaining sugar and eggs until they are thick, pale and doubled in volume, about 3 minutes. Using the rubber spatula, delicately fold the whipped eggs into the chocolate mixture. When the eggs are almost completely incorporated, gently fold in the dry ingredients.

Baking the brownies
Pour and scrape the batter into an unbuttered 9 inch square pan. Bake the brownies for 25 to 28 minutes, during which time they will rise a little and the top will turn dark and dry. Cut into the center at about the 23-minute mark to see how the brownies are progressing: They’ll be perfect if they’re just barely set and still pretty gooey. They’re still awfully good on the other side of set, so don’t worry if you miss the moment on your first try. Cool the brownies in the pan on a rack. Cut into 1 ½ by 3-inch bars to serve.

Storing
The brownies will keep, covered, for 2 to 3 days at room temperature and can be frozen for up to a month. Thaw still wrapped, at room temperature. These never freeze solid, so you might want to think about using them as a mix-in for ice cream.

makes 18 brownies

Wednesday, November 4, 2009

all about apples


To a pastry chef, apples fall into one of two categories-eating apples and baking apples. Eating apples are quite sweet and juicy, but unfortunately, are usually not able to maintain those qualities in a baked item, often collapsing into applesauce when fully cooked. Baking apples have a strong flavor and are generally a bit drier in texture, holding their shape beautifully even with prolonged cooking in a pie. The best baking apples in the supermarket are Granny Smith, Pippin, and Fuji, but every baker has a favorite, so feel free to experiment. Other good baking apples include Braeburn, Gala or Rome. Explore local possibilities at farmers’ markets, where you may find “antique” or heirloom varieties of apples that are grown in small quantities and do not ship well; sometimes they are less than beautiful. These apples are usually far superior to anything you can find in a supermarket. Apple season begins in late summer and continues until the last variety is picked, sometime in November.

Simple and lovely on their own, these individual pastries are even better with a scoop of vanilla ice cream alongside or a dollop of crème fraîche. They’re best when warm from the oven, so if it helps with timing, you can assemble them ahead and refrigerate for a couple of hours before baking (don’t brush with egg until the last minute, though). Slicing the apples is a breeze; try to aim for uniform thickness so they cook evenly.

Enjoy!
Shannon


Flaky Apple Pinwheels
Serves 4

2 medium apples (12 ounces), such as Braeburn, Gala, or Rome
¼ cup sugar
¼ tsp. ground cinnamon
Scant 1/8 tsp. nutmeg, preferably fresh ground
Pinch of kosher salt
1 sheet frozen puff pastry (9 ounces), thawed at room temperature for 45 minutes (keep refrigerated until ready to use)
1 Tbsp. unsalted butter, cut into small pieces
1 large egg
Turbinado sugar, or another coarse sugar, for sprinkling (optional)

1. Preheat the oven to 400°F. Line a baking sheet with parchment paper. Peel the apples and cut them into ¼ inch thick slices. Put the apples in a medium bowl. Sprinkle with the sugar, cinnamon, nutmeg, and salt, and toss until evenly coated.

2. On a lightly floured surface, gently unfold the puff pastry and roll it out to a 12-inch square (use a ruler; don’t guesstimate). Cut it into four 6-inch squares. Put the squares on the lined baking sheet. Drop the butter pieces evenly over the apples. Moisten the four corners of one of the pastry squares with the water. Lift up and join the corners together in the center, first squeezing them firmly and then giving a good hard twist (don’t be shy; firm pressure is essential or the pinwheels may open during baking). Repeat with the other three squares.

3. Lightly beat the egg in a small dish. Brush the pastries with the egg; be sure to coat all surfaces, including the sides and the center knob. Sprinkle each pastry with a little turbinado sugar. Bake until the pinwheels are deep golden on top and bottom (lift one up to check), about 25 minutes. Set the pan on a rack for 5 to 10 minutes before serving.

Thursday, October 29, 2009

Chilaquiles Verdes

 
Chilaquiles are a traditional Mexican peasant dish of fried tortillas bathed in either green or red salsa (depending on the region) until tender.  Slightly tart green tomatillo sauce is my preference and is the base of the recipe from the famed restaurant ¡Lotería! in the L.A. Farmers Market. 

Tomatillos are referred to as the green tomato (Spanish: tomate verde) but are not related to tomatoes, but are in the plant family related to goose berries.  The tomatillo fruit is surrounded by a paper-like husk that can be easily removed.  Fresh ripe tomatillos will keep in the refrigerator for about two weeks.  They will keep even longer if the husks are removed and the fruits are placed in sealed plastic bags stored in the refrigerator.  They may also be frozen whole or sliced.
Chilaquiles are most commonly eaten at breakfast time, unlike nachos; chilaquiles are a meal to be eaten with a fork. Nothing is wasted in the Mexican home, so this dish was born as a clever way to revive yesterday's tortillas and leftover salsa.  You can top with a fried egg (my choice) or shredded chicken or beef, even black beans.  If frying your own tortilla chips seems too involved (I recommend you try it, though-it is really very easy!), as a shortcut this dish can be made with store bought tortilla chips, but choose the unsalted variety.

Enjoy!
Shannon


Chilaquiles Verdes
recipe from ¡Lotería!

Salsa Verde

8 medium tomatillos (about 1½ pounds), husked and rinsed
1 serrano or jalapeño chile, stemmed
½ white onion, halved again
2 garlic cloves
½ bay leaf
Pinch of dried oregano
Pinch of dried thyme
½ tsp. salt
¼ cup low sodium chicken broth
1 Tbsp. corn oil

Vegetable oil for frying
12 six-inch corn tortillas
2 large eggs, beaten
½ cup shredded Monterey Jack cheese
2 Tbsp. crumbled queso fresco or mild feta cheese
3 Tbsp. finely chopped white onion
1 Tbsp. finely chopped fresh cilantro
Crema fresca or sour cream for garnish

To make the salsa verde:  Put the tomatillos, chile, onion, and garlic in a medium pot and add water to cover.  Bring to a boil over high heat.  Reduce the heat to medium-low and simmer until the vegetables are soft and the tomatillos turn pale green, 15 to 20 minutes.  Remove from the heat and let cool slightly.  Carefully transfer the boiled vegetables, along with the cooking water, to a blender.  Puree for a few seconds to blend; be sure to hold down the lid with a kitchen towel for safety.  Add the ½ bay leaf, oregano, thyme, salt, and broth.  Continue to puree until smooth. You should have about 1 quart of salsa verde.
Place a wide pot or pan over medium-high heat and coat with the corn oil.  When the oil is hazy, pour in the salsa verde; it will bubble a bit.  Reduce the heat to medium and simmer, stirring occasionally, until the sauce is slightly thickened, 10 to 15 minutes.  Cover, reduce the heat to very low, and keep warm while you fry the chips.
Pour the vegetable oil into a heavy-bottomed pot or countertop deep fryer to a depth of about 2 inches and heat to 375° over medium-high heat.  Stack the tortillas and fan them with your thumb to separate.  Cut the tortillas into 8 wedges like a pie.
Working in batches, fry the tortilla chips, turning them with a skimmer or slotted spoon so they don't stick together, until golden brown, about 2 to 3 minutes.  Remove the chips to a paper towel-lined baking pan or brown paper bag to drain and cool.  (let the oil return to the proper temperature between batches.)
To finish the chilaquiles, uncover the salsa verde and raise the heat to medium.  Just when it starts to bubble, stir in the beaten eggs.  Cook and stir for about 5 seconds, until the egg feathers into the sauce, thickening and binding it.  Immediately add the chips, tossing gently until they have absorbed enough sauce to become soft.  Take care not to break the chips.  Sprinkle Jack cheese on top and let it melt.
Divide the chilaquiles among 4 plates.  Sprinkle with queso fresco, chopped onion, and cilantro.  Garnish with crema fresca and serve immediately.

Monday, September 21, 2009

sometimes less is more


Sometimes the simplest of things just can't be improved upon.
My local farmers market was bursting with berries this weekend, and I couldn't help myself. The juicy sweetness of these little beauties is unparalleled. I happened to have a little brioche leftover from this outstanding bakery up the coast in Santa Barbara called D'Angelo's. So why not slather on some softened Irish butter, a sprinkling of sugar, and then scatter some fresh raspberries on top with a little more sugar to give them a light dusting.
This delicious combination ended up being my breakfast, but I'm thinking it could fall into the "snack" category as well as even a simple dessert.
Enjoy!
Shannon