Showing posts with label dinner. Show all posts

Saturday, July 24, 2010

commander in cheese


Roquefort is renowned throughout the world as the “King of Cheeses”. It was named after a village in the south of France and is infamous for its pungent smell and characteristic blue veins of mold.

The story behind the origins of Roquefort blue cheese has been romanticized in an old legend. It begins with a young shepherd who was minding his flock of sheep in the hills of Roquefort when he suddenly sighted a beautiful maiden in the distance. Determined to find her he left his dog to guard the sheep and hastily placed his lunch-bread and ewe’s milk curds in the nearby caves to keep cool. The shepherd was away for days, looking for his maiden. Unfortunately, he never found her. The shepherd, dejected, returned to his sheep tired and hungry. When he took his lunch out of the caves, he found that the bread and milk curds were moldy. His hesitation was brief due to his hunger. With some trepidation, the shepherd took a bite and was pleasantly surprised to find that his moldy lunch tasted so good! Roquefort was born.

Whether this story is true or not, the fact remains that Roquefort is delicious. True, it is an acquired taste, and many are thrown off by its strong smell. But this is a pity, because Roquefort’s moist and creamy texture is a delectable experience not to be missed.

If you are on the fence about this cheese, why not give this recipe a try. It is the classic paring of a sweet tender pear with the salty pungent cheese. Put together in a pastry shell and filled with a simple mixture of cream and eggs. This lovely tart is a perfect lunch dish or served for a light dinner.

Enjoy!
Shannon


Pear and Roquefort Tart
Serves 6

1 recipe for pastry
6 oz. Roquefort
1 ripe pear, peeled, cored, and sliced into small dice
2 eggs
1 cup cream
1 tsp. freshly grated nutmeg
Salt
Freshly ground pepper


After preparing your pastry dough following the link above, place one round of the uncooked pastry dough into a 10” tart shell with removable bottom.


Scatter prepared pear onto the pasty shell evenly. Then using your fingers break off small chunks of the Roquefort cheese and place in between the pear pieces.


In a small bowl beat the eggs lightly, add the cream, nutmeg and salt and pepper. Mix together well. Pour mixture over the pears and cheese. Bake in a 425° preheated oven until set. About 20 minutes. Serve warm or at room temperature.


Friday, April 23, 2010

up the coast, part 3


Before making our way back home on the last day of our trip up the coast, we decided to stop into a local dining establishment for breakfast.

Big Sky Cafe has been a local favorite in San Luis Obispo as well as food critics from around the world, since 1994. It has had stellar reviews from such noted publications as the New York Times, the Wall Street Journal, Gourmet Magazine (back in ’08), and even Rachel Ray.

They specialize in using produce from local farms. A quote from the chef/owner Charles Myers was quoted in Gourmet Magazine as saying “Every year our local farm resources deepen and improve…we have an ever expanding palate of organic fruits and vegetables, farmstead cheeses, olive oils, and vintage vinegars to create our fresh market dishes daily.”

The décor of the restaurant is interesting. In that it seems to have this hippie/southwest motif. There are tie-dyed tapestries, a lot of wood paneling, with a bit of odd statuary thrown in for good measure. The desert landscape paintings that are placed around the dining room are lovely, my favorite being the one adjacent to the long hardwood bar.

When looking at the menu I knew I wanted to go beyond the typical omelet or bowl of fruit. This led me to three options the Red Flannel Turkey Hash with Basil-Parmesan glazed eggs, the Devil’s mess, or the Traditional New Mexican Pozole. Decisions, decisions.


I landed on the pozole. A spicy hominy stew with peppers, tomatillos, pumpkins seeds, cumin & cilantro with a poached egg on cornbread with queso fresco.

It was a good choice. So good in fact that since I’ve been home I have been trying to make my own version of pozole that might come somewhat close to theirs. I believe I have succeeded. The earthy dark pasilla chile, along with the fire roasted tomatoes and chicken stock make a soul satisfying broth. The creamy rich avocado and cheese add richness, and the crunch of the toasted pepitas rounds the soup beautifully.

If you want to make the Big Sky version the owner has a blog in which he posted the recipe (just love when they do that!) but it is pretty involved and a little time consuming. My version is much simpler and has its own merits. With or without the cornbread and poached egg this is a tasty breakfast, lunch or dinner.

Enjoy!
Shannon


Pozole my way
serves 4 to 6

3 large dried pasilla (negro) chile, stemmed and seeded
2 15-ounce cans diced tomatoes in juice (preferably fire-roasted)
2 Tbsp. vegetable oil or olive oil
1 medium white onion, roughly chopped
3 garlic cloves, peeled
1 ½ quarts chicken broth (preferably homemade)
1 Tbsp. dried epazote or Mexican oregano
1 Tbsp. cumin
3 15- ounce cans hominy, drained
8 ounces shredded cooked chicken or pork
½ cup toasted pepitas seeds
1 large ripe avocado, pitted, flesh scooped from the skin and cut into ½ cubes
1 cup queso fresco, crumbled
½ cup Mexican crema, sour cream or crème faîche for garnish
Cilantro leaves for garnish
Lime wedges, for serving


Quickly toast the chile by turning it an inch or two above an open flame for a few seconds until its aroma fills the kitchen. (Lacking an open flame, toast it in a dry pan over medium heat, pressing it flat for a few seconds, then flipping it over and pressing it again.) Break the chile into pieces and put in a blender jar along with the tomatoes with their juice. (A food processor will work, though it won’t completely puree the chile.)

Heat the oil in a medium (4-quart) saucepan over medium-high. Add the onion and garlic and cook, stirring frequently, until golden, about 7 minutes. Scoop up the onion and garlic with a slotted spoon, pressing them against the side of the pan to leave behind as much oil as possible, and transfer to the blender with the tomato mixture. Process until smooth.

Return the pan to medium-high heat. When quite hot, add the puree and stir nearly constantly, until thickened to the consistency of tomato paste, about 6 minutes. Add the broth and epazote, if using or Mexican oregano and cumin. Reduce the heat to medium-low and simmer for 15 minutes. Taste and season with salt, usually about a generous teaspoon (depending on the saltiness of the broth).

Just before serving, add the hominy, and chicken to the simmering broth. Divide the pepitas, avocado, cheese and cilantro between the serving bowls. When the hominy and chicken have warmed through, usually about 5 minutes, ladle the soup into the bowls. Garnish with crema. Pass the lime separately

Thursday, April 15, 2010

up the coast, part 1


The hubby and I decided to take a couple days off from work and head up the coast to check out some property in the central coast area. We couldn’t have picked a better time; the weather was cool and clear after a small rain storm the previous day. We got an early start, picked up my caffeine fix and pushed through the L.A. stop and go. But since we were getting away, even the traffic couldn’t faze us. We had our trusty map (which ended up not being so trusty after all) and a list of some highly rated food spots as well as days and times of some local farmers markets in the area that we wanted to check out.

Our first stop was in Pismo Beach which boasts of white sandy beaches, a Monarch Butterfly Grove, hiking trails of beautiful beaches with tide pools, coves and caves. But of course those were not the priority, no I had in mind a tasty bread bowl filled with a rich, creamy clam chowder from Splash Cafe.


Splash is famous for their clam chowder and apparently their recipe has been sought after from publications such as Gourmet and Bon Appetit but to no avail. You can order their chowder online, but if you are driving through, it is worth the stop. When you order the chowder, getting it in the bread bowl is the only way to go.  They cut out the center section of the sourdough boule, grill it up and serve along side the bread bowl for dipping. The chowder is thick and creamy with traces of potato and an underpinning of garlic. So good.


Since I’ve been back home, I have been thinking about the chowder, probably way too much. So I thought I would search out a recipe that might be a close match. This recipe from Restaurant Budd Bay Café in Olympia Washington is pretty darn close to Splash.  So if heading to Splash Café in Pismo Beach isn’t in your upcoming plans making this recipe could be a way to visit Splash vicariously.

Enjoy!
Shannon


Smokey Clam Chowder
Bon Appétit December 1996 Restaurant: Budd Bay Cafe; Olympia, Washington

1 pound russet potatoes, peeled, cut into 1/2-inch pieces
1/2 cup (1 stick) butter
3 celery stalks, chopped
1 medium onion, chopped
1/2 cup all purpose flour
6 8-ounce bottles clam juice
4 6 1/2-ounce cans chopped clams with juices
1 tablespoon chopped fresh parsley
1/2 teaspoon chopped fresh thyme or 1/4 teaspoon dried
1/2 teaspoon chopped fresh marjoram or 1/4 teaspoon dried
1/2 teaspoon chopped fresh dill or 1/4 teaspoon dried dill weed
1/4 teaspoon powdered garlic
1/8 teaspoon liquid smoke*
2 cups whipping cream
1 cup whole milk
1 tsp. sherry for serving (optional)

Boil potatoes in large saucepan of salted water until just tender, about 6 minutes. Drain potatoes well.

Melt butter in heavy large pot over medium-high heat. Add celery and onion and sauté until onion is translucent, about 6 minutes. Add flour and stir 2 minutes. Gradually mix in clam juice. Simmer until beginning to thicken, stirring frequently, about 2 minutes. Add clams with juices, parsley, thyme, marjoram, dill, garlic, liquid smoke and potatoes. Simmer 5 minutes to blend flavors. Add cream and milk. Bring to simmer. Season to taste with salt and pepper. (Can be prepared 1 day ahead. Cover and refrigerate. Bring to simmer before serving.)

Optional:  One ingredient that really makes this chowder exceptional is to pour about a teaspoon of cream sherry on to the top of the chowder right at serving.  I prefer using Fino or Manzanilla which are both pale, straw colored. Both are excellent with seafood, mild cheese, fish or ham. The delicate crisp aroma and nutty flavor are a nice counter balance to the rich and creamy chowder.

*Liquid smoke is a smoke-flavored liquid seasoning available at specialty foods stores and many supermarkets.


Sunday, April 11, 2010

a nice rack


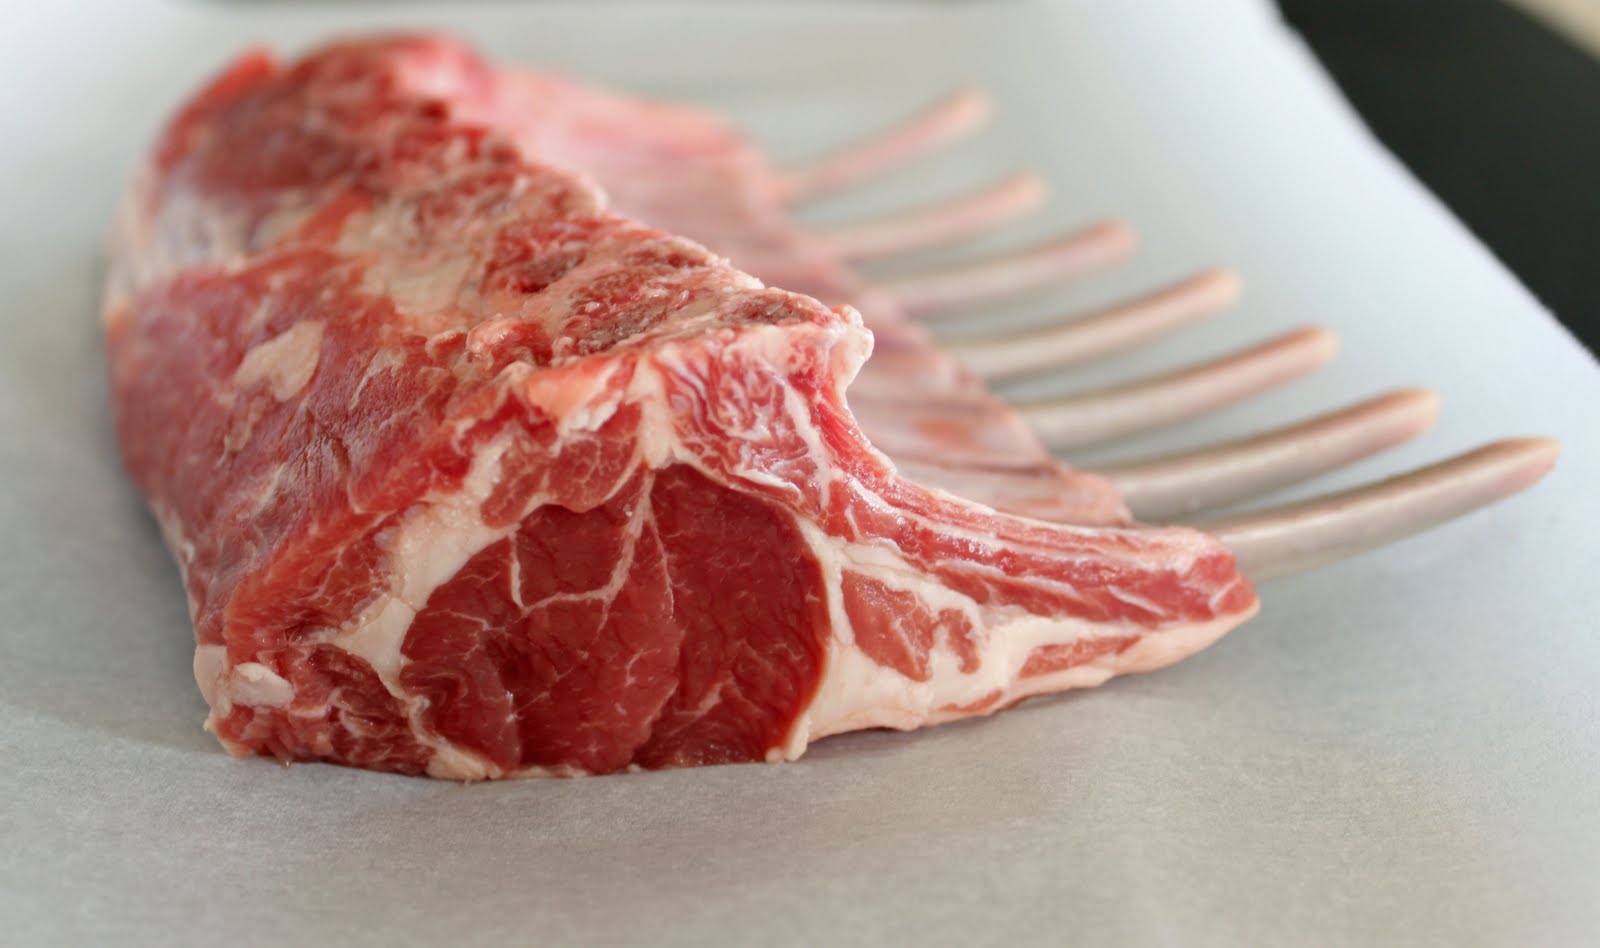
This is probably one of the simplest most delicious dinner ideas that I’ve come across and has become a favorite dinner in my home as of late. A local grocer of mine frequently has a fresh New Zealand rack of lamb that is the perfect dinner for two.

I am of the mind to only season meat with some extra virgin olive oil and then pat it down good with some kosher salt and freshly ground pepper. When cooked properly there is nothing better.

I like to start the cooking with a smoking hot sauté pan that is oven safe. Set the oven to 425° and let it heat up before you get everything going. Then when the pan is ready, set the rack of lamb fat side down. Just let it sit until it gets a good sear, probably for 2-3 minutes at most. Then turn it over and put the pan into the oven to finish off. After approximately 12-15 minutes take it out, put onto a carving board and let it rest for another 10 minutes or so.

After it has rested you will have the most tender, beautifully crusted exterior with a lovely blush pink interior. I like to serve this with a salsa verde on the side with some simply roasted vegetables. It's the perfect dinner.

Enjoy!
Shannon


Monday, February 8, 2010

sunday dinner


After reading a recipe for Chicken with Olives by Lidia Bastianich from her cookbook Lidia Cooks From the Heart of Italy, it reminded me of a recipe that I’ve been making for years from the Silver Palate Cookbook called Chicken Marbella. Chicken Marbella not only includes the brine cured green olives like Lidia’s but also has the distinctive flavors of prunes and capers, the combination of which has long been a family favorite. The only draw back on the Silver Palate recipe is that I have to be slightly more organized in my meal planning because the recipe requires overnight marinating.

So for years I have obeyed, not wanting to deviate in the least bit in fear of dry, un-flavorful chicken. Well, I believe I have found a happy medium in following the process in Lidia’s recipe but using the ingredients I’ve come to love from the Silver Palate girls. It must have been skillet simmering that did the trick, turning butter, wine, garlic as well as the capers, olives and prunes into a sauce that tasted, and smelled, as if it had been hours in the making. I served it in shallow bowls, so that every last drop of the flavorful sauce could be sopped up by a crusty french loaf. The result: moist and delicious. Plus, it was a pretty quick throw together for a simple Sunday dinner.

Enjoy!
Shannon

Chicken Marbella My Way
Serves 4

1 3-4 lb. chicken, cut up into 10 pieces
1 tsp. kosher salt
2 Tbsp. extra-virgin olive oil
2 Tbsp. unsalted butter
5 garlic cloves, peeled and slightly smashed
4 bay leaves, preferably fresh
1 cup brine-cured green olives
1 cup pitted prunes
¼ cup capers with a bit of juice
½ cup brown sugar
1 cup white wine

Rinse the chicken pieces, and pat dry with paper towels. Trim off excess skin and all visible fat. Cut drumsticks off the thighs; cut breast halves into two pieces each. Season chicken all over with salt.

Put olive oil and butter in the pan, and set over medium-low heat. When the butter is melted and hot, lay in the chicken pieces, skin side down, in a single layer; drop the garlic cloves and bay leaves in the spaces between them.

Cover the pan and let the chicken cook over gentle heat, browning slowly and releasing its fat and juices. After about 10 minutes, uncover the pan, turn the pieces, and move them around the pan to cook evenly, and then replace the cover. Turn again in 10 minutes of so and continue cooking covered.

After the chicken has cooked for 30 minutes, scatter the olives, prunes and capers onto the pan bottom, around the chicken. Sprinkle the brown sugar over the top of the chicken pieces and pour wine around each piece. Raise the heat so the liquid is bubbling, cover, and cook, gradually concentrating the juices, for about five minutes.

Remove the lid and cook uncovered, evaporating the pan juices, occasionally turning the chicken pieces gently until the pan juices thicken and coat the meat like a glaze.

Turn off heat and serve the chicken right from the skillet, or heap the pieces on a platter or in a shallow serving bowl. Serve with a loaf of crusty bread for sopping up every last wonderful drop.

Tuesday, January 26, 2010

the time has come

After seeing the movie Julie & Julia, the film that intertwines the story of the legendary grande dame of food Julia Child with food blogger Julie Powell, I knew the classic Boeuf à la Bourguignonne that was immortalized throughout the story would finally end up on our table.

So last week when it seemed that we finally had what we call “winter” here in southern California, basically it just rained for about 5 days in a row, I decided it was time to make it. I followed the recipe verbatim, not wanting to disappoint Julia I suppose.

There are really not that many ingredients but the steps and the time involved are the key factors. What I found was that even a mediocre cut of beef works quite well, since it cooks for so long in the wine, it breaks down beautifully. For the wine, buy something you would enjoy drinking along with the meal. I used a young red Beaujolais. But a nice Burgundy or a full-bodied Chianti would work well too. Traditionally boiled potatoes are served with this dish, but buttered noodles or steamed rice may be substituted.

Enjoy!
Shannon


Boeuf Bourguignon
From Julia Childs Mastering the Art of French Cooking
6 ounces chunk of bacon
1 Tbsp. olive oil
3 lbs. lean stewing beef, cut into 2 inch cubes
1 sliced carrot
1 sliced onion
1 tsp. salt
¼ tsp. pepper
2 Tbsp. flour
3 cups red wine
2 to 3 cups brown beef stock
1 Tbsp. tomato paste
2 cloves mashed garlic
½ tsp. thyme
1 crumbled bay leaf
18 to 24 small white onions, brown braised in stock
1 lb. quartered fresh mushrooms sautéed in butter
Parsley sprigs


Remove rind from bacon, and cut bacon into lardons (sticks, 1/4 inch thick and 1 1/2 inches long). Simmer rind and bacon for 10 minutes in 1 1/2 quarts of water. Drain and dry.

Preheat oven to 450 degrees.

Sauté the bacon in the oil over moderate heat for 2 to 3 minutes to brown lightly. Remove to a side dish with a slotted spoon. Set casserole aside. Reheat until fat is almost smoking before you sauté the beef.

Dry the stewing beef in paper towels; it will not brown if it is damp. Sauté it, a few pieces at a time, in the hot oil and bacon fat until nicely browned on all sides. Add it to the bacon.

In the same fat, brown the sliced vegetables. Pour out the sautéing fat.

Return the beef and bacon to the casserole and toss with the salt and pepper. Then sprinkle on the flour and toss again to coat the beef lightly with the flour. Set casserole uncovered in middle position of preheated oven for 4 minutes. Toss the meat and return to oven for 4 minutes more. (This browns the flour and covers the meat with a light crust.) Remove casserole, and turn oven down to 325 degrees.


Stir in the wine, and enough stock or bouillon so that the meat is barely covered. Add the tomato paste, garlic, herbs, and bacon rind. Bring to simmer on top of the stove. Then cover the casserole and set in lower third of preheated oven. Regulate heat so liquid simmers very slowly for 2 1/2 to 3 hours. The meat is done when a fork pierces it easily.

While the beef is cooking, prepare the onions and mushrooms. Set them aside until needed.

When the meat is tender, pour the contents of the casserole into a sieve set over a saucepan. Wash out the casserole and return the beef and bacon to it. Distribute the cooked onions and mushrooms over the meat.

Skim fat off the sauce. Simmer sauce for a minute or two, skimming off additional fat as it rises. You should have about 2 1/2 cups of sauce thick enough to coat a spoon lightly. If too thin, boil it down rapidly. If too thick, mix in a few tablespoons of stock or canned bouillon. Taste carefully for seasoning. Pour the sauce over the meat and vegetables. Recipe may be completed in advance to this point.

For immediate serving: Cover the casserole and simmer for 2 to 3 minutes, basting the meat and vegetables with the sauce several times. Serve in its casserole, or arrange the stew on a platter surrounded with potatoes, noodles, or rice, and decorated with parsley.

For later serving: When cold, cover and refrigerate. About 15 to 20 minutes before serving, bring to the simmer, cover, and simmer very slowly for 10 minutes, occasionally basting the meat and vegetables with the sauce.

Serves 6

Red meat is not bad for you. Now blue-green meat, that’s bad for you! ~Tommy Smothers

Friday, November 27, 2009

soups on

Here is a tasty option for some of those Thanksgiving leftovers once the stuffing and gravy have been finished off. By adding some stock, and diced turkey, along with a little bacon (never a bad idea) and a few winter vegetables you can create another meal that will warm you up on a chilly evening.  And thankfully you don't have to even turn on the oven. 

Enjoy!
Shannon


Roast Turkey and Winter Vegetable “Chowder”
Adapted from The Thanksgiving Table by Diane Morgan

3 slices bacon
1 large yellow onion, cut into ½ inch dice
2 ribs celery, cut into ½ inch dice
2 large Yukon potatoes cut into ½ inch dice
1 butternut squash, peeled, halved lengthwise, seeded and cut into ½ dice
7 cups turkey stock or canned low-sodium chicken stock
1 medium zucchini, cut into ½ inch dice
2 cups chopped, de-ribbed swiss chard leaves
2 cups ½ inch dice of roast turkey or one Rotisserie Chicken
1 Tbsp. fresh sage, torn
1 Tbsp. fresh thyme leaves
Salt & freshly ground pepper
In a heavy 6-quart stock pot, cook the bacon over medium heat, stirring frequently, until browned. Remove with a slotted spoon to plate. Set aside.

Pour off all but 2 Tbsp. of the bacon fat, and return the pot to medium heat. Add the onion and celery. Sauté until the vegetables are soft, but not browned, about 3 to 5 minutes.

Add the potatoes, squash and turkey stock. Bring to a boil, and reduce the heat to a simmer. Partially cover the pot, and cook until the potatoes are tender, about 15 minutes.

Add zucchini, swiss chard, turkey, sage, thyme and the reserved bacon. Cook 5 minutes longer.

Add salt and pepper to taste. Ladle the soup into warmed bowls and serve.

Saturday, November 21, 2009

work cited

I have never been to a formal culinary school, my “school” has been over the years watching chefs/cooks such as Julia Child, The Frugal Gourmet, even Martha Stewart. I have attempted Martha’s Gingerbread house (multiple times). Although, admittedly they never looked quite as good as hers, I consoled myself in the fact that maybe they were “photoshopped” though they probably were not.

I would rather sit down and read a cookbook than a novel. My teachers have been James Beard, Alice Waters, Nancy Silverton, and Jamie Oliver just to name a few.

I have made many a mistake in my cooking efforts and have been known to get distracted, burn something and then end up getting Chinese take-out instead. It has been a work in progress, but one that I thoroughly enjoy.

In starting this blog, I’ve tried to give credit where credit is due on the recipes given and whether they were taken straight from the originator or slightly adapted. I know there are those chefs out there that like to keep some of their dishes a secret, and that’s fine I guess. But seriously it’s only food and what good is it if we don’t share it.

With that said, the following recipe is mine. But don’t give me too much credit, it came from trying other things like it and then just adding this or that or taking something out I didn’t care for in the dish. This is the type of recipe that you could throw most anything leftover from dinner the night before and it would turn out great.

So without further adieu…here is my version of a Savory Bread Pudding.

Enjoy!
Shannon

Savory Bread Pudding

1 day old French baguette, cut into 1-2 inch cubes
6 large eggs
2 cups ½ & ½ (or milk)
1 Tbsp. Dijon mustard
a dash of some freshly grated nutmeg
salt & pepper
½ lb. pancetta (have deli cut one large hunk)
2 shallots, sliced thinly
12 oz. asparagus, cut into 2 inch lengths
1 delicata or butternut squash cut into 1-2 inch dice
3 cups cheese grated such as smoked gruyere, Manchego, sharp white cheddar (or whatever you may have left in your fridge)
Olive oil

Heat oven to 375°.
Mix eggs, ½ & ½ (or milk), Dijon mustard, nutmeg and salt & pepper in a large bowl. Toss in bread cubes, let set while you prepare the rest of the ingredients.

Toss separately the asparagus and squash in olive oil and season with salt and pepper. Put asparagus and squash on separate sheet pans. Put in the oven and roast the vegetables until tender. The asparagus if thin won’t take very long, so watch it closely about 6-8 min. The squash will take about 25-30 min. until tender.

While the vegetables are roasting, chop the pancetta into ½ inch dice, put into a preheated sauté pan and let cook over medium heat until fat is rendered and they begin to crisp up, about 10 min. At that time you can add the shallots and cook together until the shallots begin to caramelize. Take off the heat.

Once the vegetables are finished roasting, let cool a bit and then add them to the bread mixture along with the pancetta and shallots. Toss in the grated cheese.

The pudding can then be placed in either a large casserole dish, or 4 individual 2 cup oven safe serving bowls or ramekins.

Bake for 30-40 minutes until the top turns a lovely golden color.
This is a nice side dish with a simple roasted chicken and some fresh lettuces dressed in a light vinaigrette.

Serves 4

Tuesday, November 17, 2009

the board

Family traditions are defined as the handing down of statements, beliefs, customs, information, etc., from generation to generation, especially by word of mouth or by practice.

We all have traditions of some sort…some we continue…some we lay aside. Thankfully my friend Carla shared with me a cherished family tradition that I am able to pass along to you.

Carla has a rich Italian background by way of her Sicilian grandmother (who apparently was a “pasta genius”). This little grandma would travel from back east to California when Carla was a young girl, and one of the things on the agenda when she was visiting was to make pasta. Pasta enough to last until the next time Grandma would hop on that plane for another west coast visit. But on Grandma’s first trek out west she said that there was one problem, she couldn’t make the pasta without her wood board; granite or marble would not do. So thanks to a handy young man in the family a wood board was produced. It’s nothing fancy, just a large piece of plywood with a stabilizing wood piece underneath so it would easily sit on top of any counter without moving. Now Grandma was happy, and so were all the hungry pasta recipients.

When it was time to make the goods, Grandma would roll up her sleeves and start mixing, kneading, rolling and cutting all kinds of glorious pasta. Within the fog of flour that would hang in the air, wonderful strands, pillows and sheets of dough would emerge. Everyone got involved; Carla was given the task and title of the “official gnocchi roller” with her famous finger flick style, the final shape for these beauties before they hit the water. And I would like to testify that to roll a gnocchi; especially Carla’s “finger flick” does take skill, of which I have yet to be proficient.

So even though I’m not related to Carla and am Scottish, (which is quite un-inspiring on the food front) I had the opportunity to learn to make Grandmas’ Sicilian style gnocchi. And since Carla brought over Grandmas’ board it made the endeavor even more special.

The result…the gnocchi turned out great. We scattered them on sheet pans and put them in the freezer to firm up before we put them into their respective containers. Thankfully we held a few back so that we could reward ourselves and sample our labor with a simple lunch of gnocchi with browned butter and sage.

They were delicious!

Enjoy!
Shannon


Carla’s Grandmas Amazing Gnocchi
This gnocchi recipe is a little different, in that it uses ricotta cheese as opposed to potatoes.

3-3 ½ cups all purpose flour (start with using 3 cups of the flour first, then add more as needed to get the right consistency)
16 ounces ricotta
2 large eggs, room temperature

Put all the ingredients into the bowl of an electric mixer fitted with the dough hook. Mix on low speed to pull everything together, slowly increase the speed. Let the mixer knead the dough until it begins to “slap” the sides of the mixing bowl. Feel the texture of the dough; if it is still a little sticky add more flour. The final result should be a smooth dough that isn’t sticky.

Put the dough out onto a lightly floured surface, pull off a knob of dough, about the size of a golf ball. Begin to roll out the dough into a long snake that is about a finger width in diameter. Then cut the snake into 1 inch pillows, lightly flour the gnocchi as you cut them. You can cook these as is or form them into the classic gnocchi shape with a gnocchi board, or the tines of a large fork turned upside down (or give Carla a call and see she if she’ll come over to do her famous “finger flick”style). Rest the bottom edge of the gnocchi board on the work surface, and then tilt it at about a 45 degree angle. Take each piece and squish it lightly with your thumb against the board while simultaneously pushing it away from you. It will roll away and around your thumb, taking on a cupped shape -- with ridges on the outer curve from the board and a smooth surface on the inner curve where your thumb was. (Shaping them takes some time and dexterity. You might make a batch just for practice.) The indentation holds the sauce and helps gnocchi cook faster.

As you shape the gnocchi, dust them lightly with flour and scatter them on baking sheets lined with parchment paper or waxed paper. Set gnocchi filled cookie sheets in the freezer for a few minutes to firm them up if you will not cook the gnocchi until the next day or later. Alternatively, you can cook them now, in a large pot of boiling salted water. They are done when they begin to float to the surface, about 5 to 8 minutes. Drain the gnocchi and toss with a little olive oil to keep from sticking. These are wonderful with a simple toss in some brown butter and crispy sage, or one of the ways Carla typically makes these is with a marinara sauce and meatballs.

Wednesday, November 11, 2009

lunch with Teri


There are a few people in my life that I really enjoy spending time with. Unfortunately, because of schedules it doesn’t happen as often as I would like. One of these people is my friend Teri. We have known each other for more years than I want to admit, but even if we haven’t talked or got together in a while we can still pick up right where we left off. It's that kind of comfortable, cozy slipper, wrapped up in a blanket kind of friendship.

On the flip side, she is a creative genius in many ways and when we have an opportunity to do something creative together, whether it is design or food related…stand back! We sort of feed off of each other and when those creative juices start pumping just watch out. Who knows what is going to happen…although the end result is usually quite satisfying.

I put a call into her not so long ago, putting in a request for a lunch date at one of my favorite places to eat in my hometown San Juan Capistrano. It’s called Ramos House. The idea of the restaurant/ house is simple; like the old days, its owner lives and works at the house, the wines are kept in the cellar, the herbs are grown in the garden and the ice cream is turned out back. The menu changes daily and everything is made from scratch.  I have probably eaten everything on the menu, or close to it.

This particular day sitting out on Ramos’ covered patio, it was a little cool. Although I was sitting next to the wood burning stove with one of the provided blankets on my lap, I wanted something warm. The Corn Chowder with Truffled Popcorn was the ticket.

Thankfully, for both you and me John Q. the chef/owner has published his cookbook Ramos House Cafe: Recipes from the first 5 years  so I am able to share this recipe with you.

I did make this at home and it was just as good…although it would have been better if Teri were there.

Enjoy!
Shannon


Corn Chowder
From the Ramos House

10 ears of sweet white corn
1 yellow onion, diced (1 cup)
¾ cup butter
¾ cup masa harina (corn flour)
½ cup diced red bell peppers
1 bunch scallions, thinly chopped
½ cup celery, diced
1 Tbsp. chipotle chilies, pureed
1 cup white corn hominy
1 tsp. dried oregano
1 tsp. garlic, minced
1 tsp. fresh chopped thyme
1 russet potato, diced into ¼ inch cubes

Freshly popped corn
Truffle oil (optional)

Method:
Cut kernels from the cobs and set aside. Place corn cobs in a large stock pot and cover with water (approx. 8 cups). Bring water to a boil, reduce heat and simmer for 1 hour. Remove from heat and strain the corn stock through a sieve, discarding the cobs and reserving the liquid.

In a separate stock pot, melt butter over medium heat. Add masa harina and incorporate using a whisk. Stirring constantly over medium-low heat, cook the masa roux for approximately 5 minutes. Add onions, peppers, celery, garlic, scallions, oregano, thyme, chipotles, and reserved corn kernels. Stir to coat the vegetables with roux. Cook for 5 more minutes over medium, stirring occasionally to avoid scorching the bottom of the pot. Add corn broth and remaining ingredients, bring to a simmer. If soup seems too thick, add water, chicken stock or vegetable stock. Reduce heat and simmer for 20 minutes or until potatoes are tender. Taste and season with salt and pepper. Top off with some freshly popped corn and drizzle on some truffle oil.

Serves 6 -8

Wednesday, September 2, 2009

In Memoriam


Award-winning cookbook author and chef Sheila Lukins passed away on Sunday in her home in Manhattan. Sheila Lukins and her Silver Palate food shop changed the way Americans ate in the early 1980's.

In 1979, Patricia Wells...called it a "tiny food shop with big ideas," referring to it's handmade zucchini pickles and blueberry preserves, made from local produce whenever possible.

Julia Moskin writes in the New York Times, "From a 156-square-foot shop and kitchen at Columbus Avenue and 73rd Street, the women and their recipes-Mediterranean chicken salad, curried butternut squash soup, spicy carrot cake-intrigued, and then guided, the increasingly adventurous palates of New Yorkers."

I have been in possession of my treasured, dog-eared Silver Palate Cookbook for over ten years and have made many a recipe, most of which have become family favorites. From the ginger candied carrots, the pasta puttanesca, beef carbonnade, to my all time favorite, chicken marbella.

The distinctive colors and flavors of chicken marbella include olives, capers and prunes (yes, prunes). It's good hot or at room temperature. The overnight marination is essential to the moistness of the finished product: the chicken keeps and even improves over several days of refrigeration. The recipe below is directly from the cookbook and gives quantities to serve 10-12, but can be successfully divided to make a smaller amount if you wish.

Julia Moskin ended the article saying "when Sheila Lukins and Julee Rosso wrote The Silver Palate Cookbook, they offered home cooks a fresh alternative for entertaining. The book's big, sophisticated flavors were produced from accessible ingredients and modest cooking skills, not from French techniques or canned creamed soups. Editors admonished the authors for their exuberant seasoning style. 'No, girls, no,' a copy editor wrote on one recipe. 'No one puts 25 cloves of garlic in ratatouille!' The authors retested the recipe and kept it."

I love that.

So in honor of Sheila here is her famous chicken marbella.

Enjoy!

Shannon


Chicken Marbella
from the Silver Palate Cookbook

4 chicken, 2 1/2 pounds each, quartered
1 head of garlic, peeled and finely puréed
1/4 cup dried oregano
coarse salt and freshly ground black pepper to taste
1/2 cup red wine vinegar
1/2 cup olive oil
1 cup pitted prunes
1/2 cup pitted Spanish green olives
1/2 cup caper with a bit of juice
6 bay leaves
1 cup brown sugar
1 cup wine
1/4 cup Italian parsley or fresh coriander (cilantro), finely chopped


1. In a large bowl combine chicken quarters, garlic, oregano, pepper and coarse salt to taste, vinegar, olive oil, prunes, olives, capers and juice, and bay leaves. Cover and let marinate, refrigerated, overnight.

2. Preheat oven to 350°F.

3. Arrange chicken in a single layer in one or two large, shallow baking pans and spoon marinade over it evenly. Sprinkle chicken pieces with brown sugar and pour white wine around them.

4. Bake for 50 minutes to 1 hour, basting frequently with pan juices. Chicken is done when thigh pieces, pricked with a fork at their thickest, yield clear yellow (rather than pink) juice.

5. With a slotted spoon transfer chicken, prunes, olives and capers to a serving platter. Moisten with a few spoonfuls of pan juices and sprinkle generously with parsley or cilantro. Pass remaining pan juices in a sauce boat.